
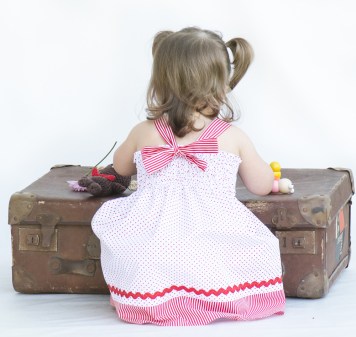
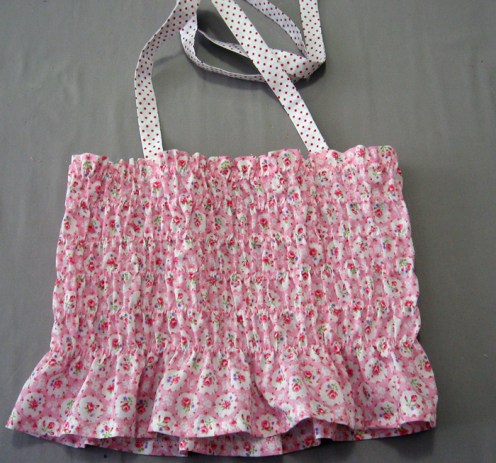
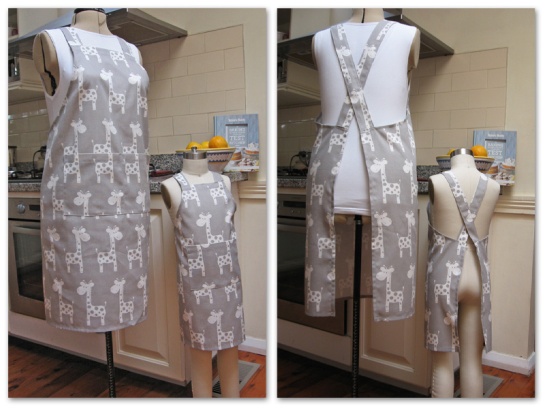
Welcome to this free sewing tutorial by Felicity Sewing Patterns. Zigzag stitched elastic shirring is an alternative to the bobbin shirring method. The tutorial shows step by step how to make this useful and and attractive application. All the information you will need to make this adorable little shirred dress, including the pattern instructions, are in the tutorial below.
See the notes at the end of the tutorial for the Shirred Top to match the Silly Frilly Shorts.
Zigzag Stitched Elastic Shirring
The shirring I am going to show you here is not made using shirring elastic on the machine bobbin. This method of shirring is made using narrow width flat elastic which is stitched on in rows using a zigzag stitch setting. I prefer this method because it is much stronger and longer lasting than bobbin shirring. Zigzag shirring gives a more professional finish, it is adjustable and you do not need as much fabric width as with bobbin shirring. Bobbin shirring is softer and most suitable for baby clothes. Zigzag shirring requires accurate, straight stitching, not hard to do if you take care, the results are worth it.
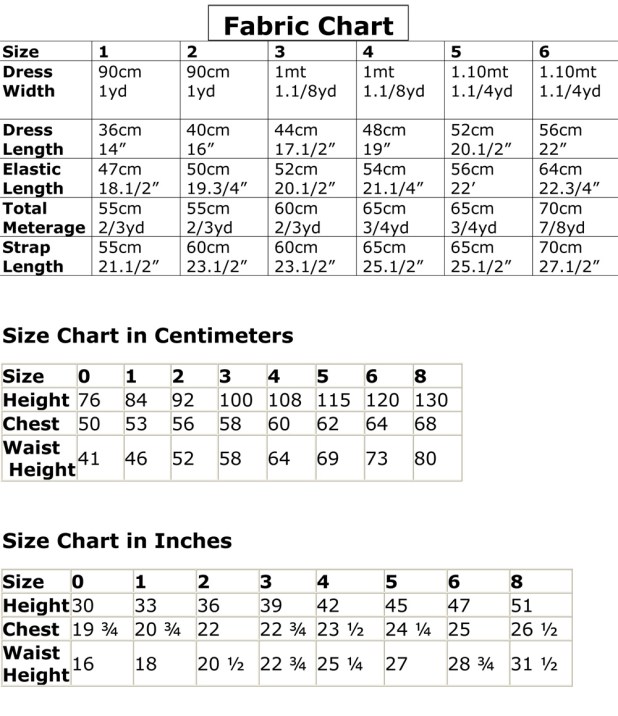
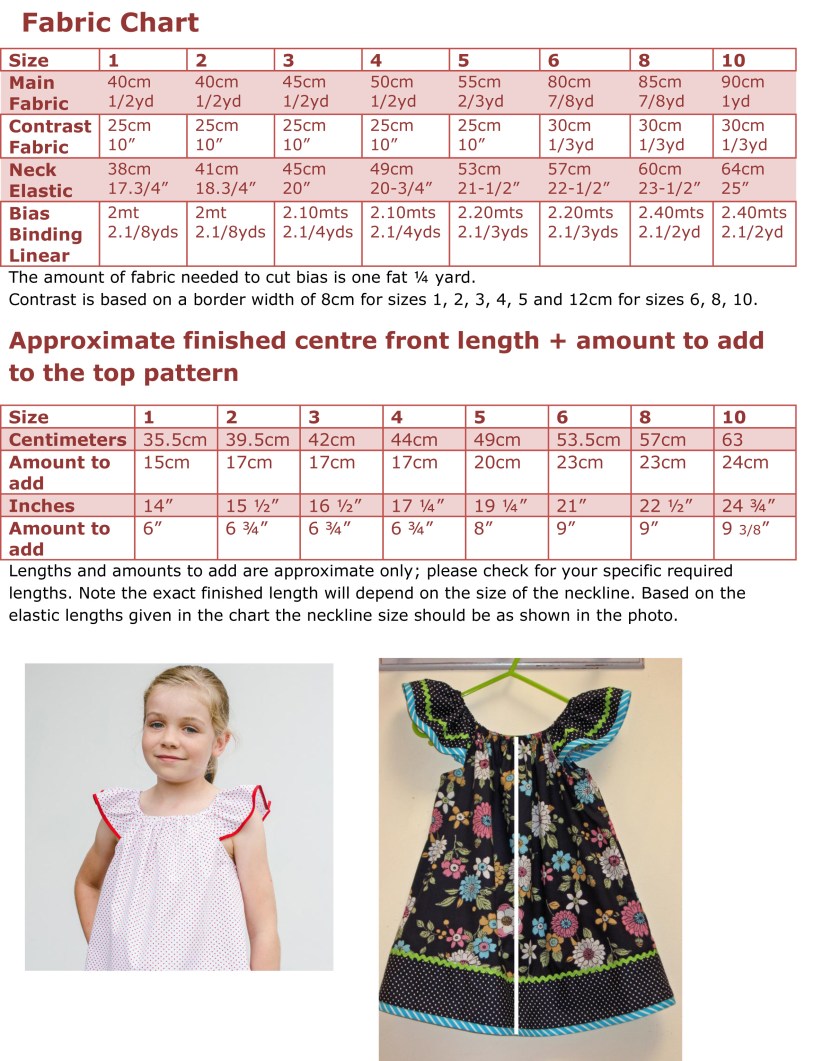
There is no pattern file for this dress as it is just a rectangle of fabric. The table below gives measurements for all the parts required to make the dress in sizes 1 to 6 years old.
The measurements are the basic requirements only; you can add to the width if you want more fullness. The length can be altered to suit a top or skirt without needing to alter the elastic requirements. If you want larger sizes you can add a minimum of 10cms or 4 inches to the width for every additional year of age, plus add length as required. When deciding on your own dimensions, remember to add 4cm or 1.5 inches for the hems at top and bottom.
You can add a contrast border: make this any width you like; 8 -12 cm wide is best depending on the size you are making. Subtract the width of the border from the overall length given in the table and remember to add a seam allowance for the joining seam.
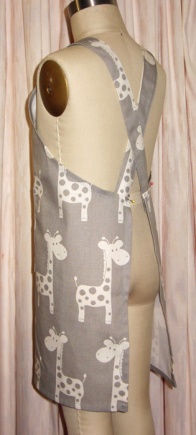
The straps are 7cm / 2.3/4” wide for all sizes and the lengths are given in the table.
The loop: cut a small strip of self fabric 8 x 2.5cm or 3 x 1 inches.
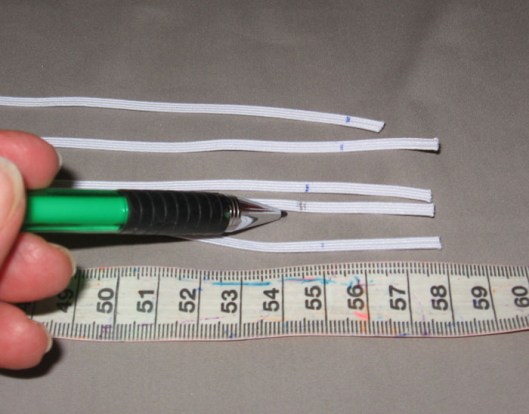
Elastic: the only elastic to use for this method is a flat 3mm or 1/8” wide woven, flat elastic.
Rickrack braid: to fit the width of the skirt. Optional but very effective.
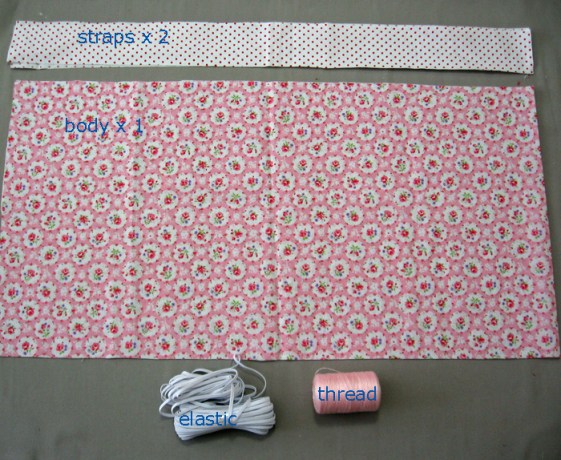
From sizes 1 to 6 you can cut the rectangle in one piece across the width of a 112cm / 45” cloth. The total meterage includes the straps but you will need to take into consideration if you are going to add a border in contrast fabric. Zip down to the end of the tutorial to find the size charts for body measurements in centimeters and inches.
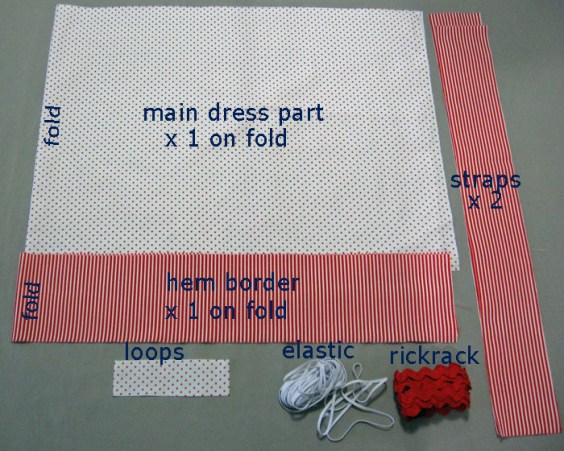
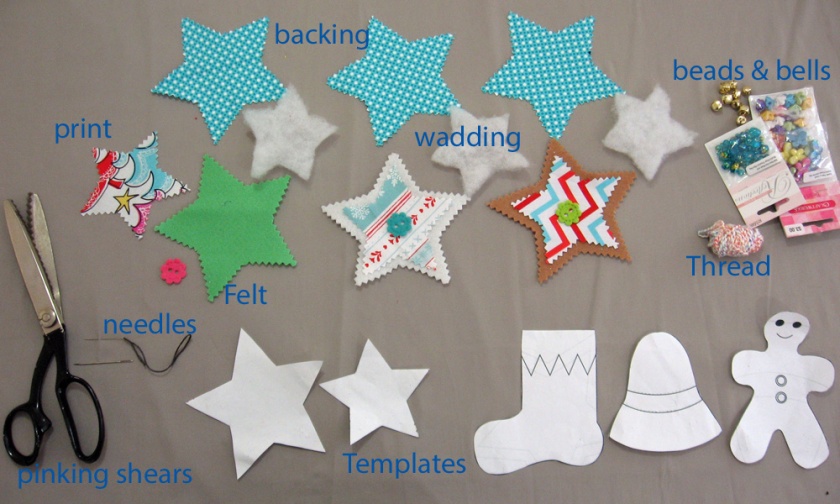
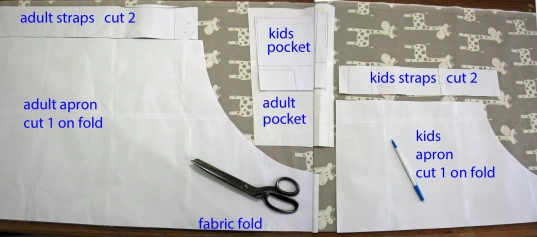
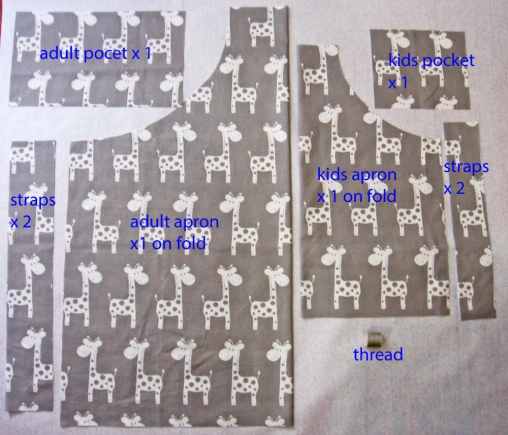
Check the photo to see if you have cut all the parts you will need.
Main skirt piece, Optional border piece, Straps, Loop, Elastic 3mm / 1/8” x 5 rows. You will also need matching threads.
Start Sewing
1/ Prepare the elastic strips.
The only elastic to use for this method is a flat 3mm or 1/8” wide woven, flat elastic. Cut the elastic strips with 3 or 4 cm extra on the length of each piece; mark the exact measurement length with a pencil. Prepare 4 to 6 rows depending on the size you are making. I used 5 rows on my size 3 sample. Or you may want to do only 2 or 3 rows.
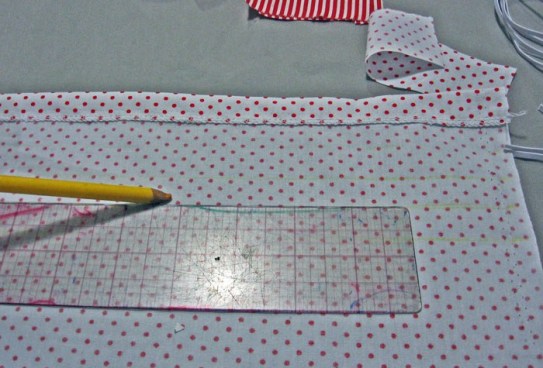
2/ Prepare the skirt: if your dress is in 2 pieces seam these together to form one long piece, overlock the top edge and press under 2cm/ ¾” and stitch this down.
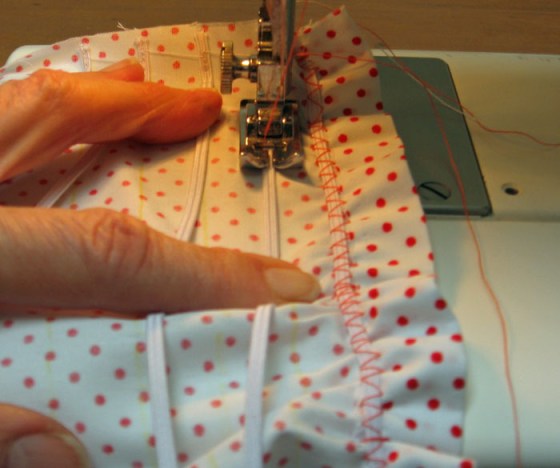
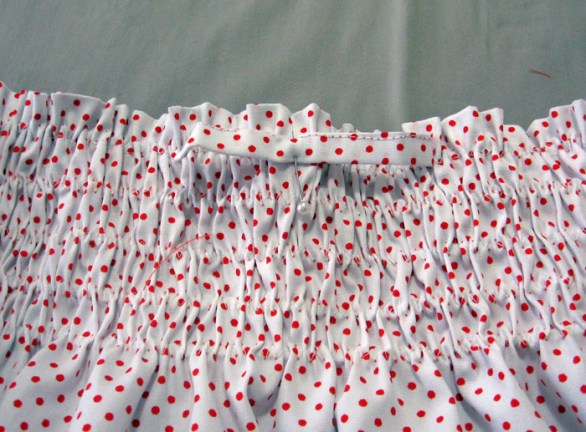
The shirring rows are placed 15mm / 5/8” apart this is equal to 2 widths of the machine foot.
It is easier to sew straight if you mark each row with chalk pencil.
You could place the rows wider apart if you prefer.
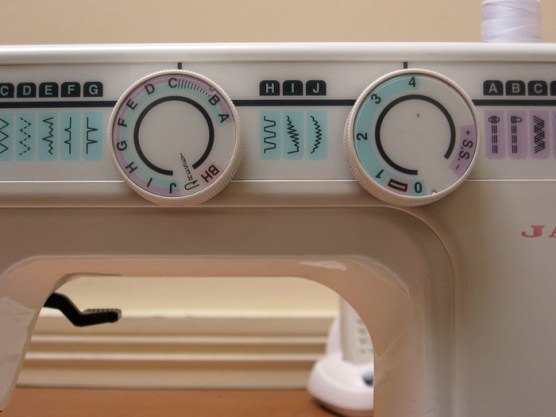
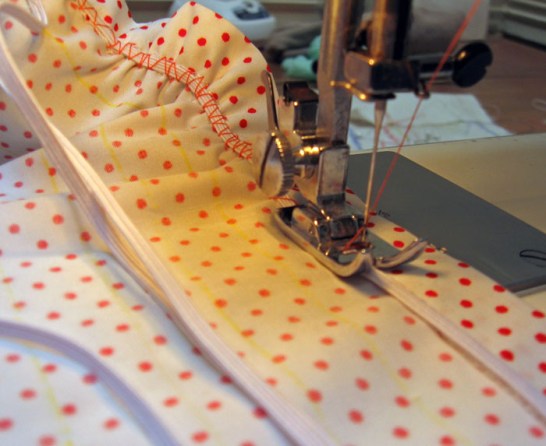
3/ Set the machine: to sew the rows of elastic down you need to set the machine on a large/wide zigzag stitch. The stitch has to be wide enough to span the elastic without stitching it down but actually forming a small channel. Set the zigzag stitch to its widest and set the stitch length to the maximum length. Use plain all purpose sewing thread on the needle and bobbin.
4/ Stitch the elastic rows: flick the machine stitch back to plain stitch. Start at one side seam and sew the ends of all the elastic strips in place where you have marked the rows, back tack a couple of times to secure well.

Flick the stitch back to large zigzag and sew the first row along the edge of the hem turning. As you sew make sure that the stitching does not catch the elastic. When you start to run out of elastic, make sure the needle is down and gently tug on the end to pull the elastic through the stitching, keep going like this till you reach the other seam edge. Use a pin to secure the end of the elastic at the mark for the finished length.
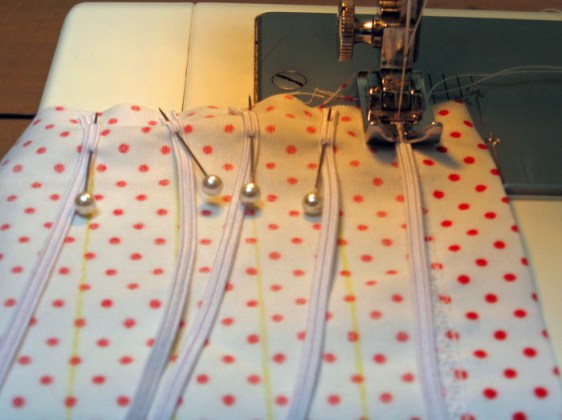
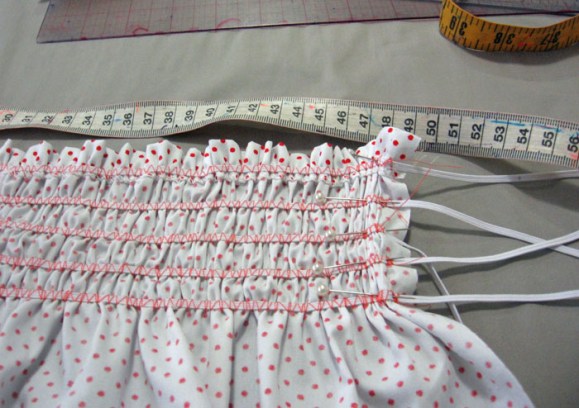
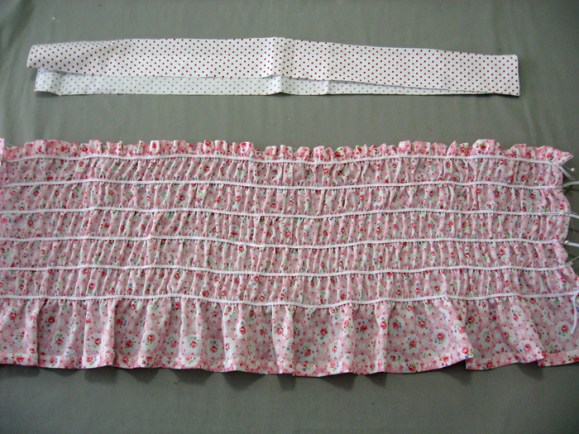
Sew all the elastic rows the same way, make sure to smooth out the fabric as you go so you do not stitch tucks or gathers in with your rows. When you have all rows sewn and secured with a pin at the edge check the size and tension of the elastic now before you sew the loose ends down. The elastic should move freely through each small zigzag channel, so if you want to tighten it up you can pull on the ends. Be careful not to let an elastic end slip back down the channel. To finish set the machine back to the normal sewing setting and stitch each end with a couple of backtracks to secure well.
A good rule of thumb for getting the elastic tension right is to set the finished length about 6 cm / 2.1/2″ smaller than the body measurement e.g. if a size 3 chest is 58cm / 22.3/4″ then set the finished shirring at 52cm / 20.1/4″ this will give enough tension without being tight. Elastic strength can vary so it’s always best to check the finished size before securing the elastic rows.
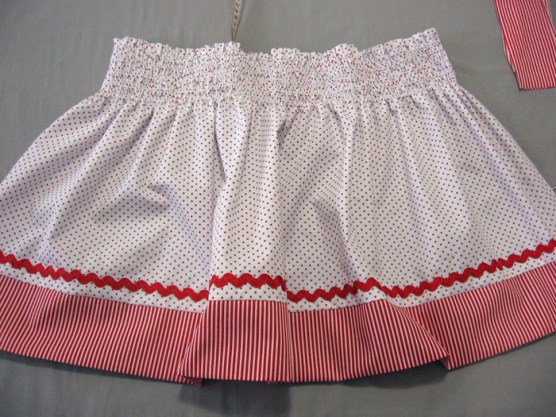
Your shirring is finished and you can complete the dress.
5/ Make the skirt: before you sew up the side seam sew the border on, overlock the seam and press. Next sew the rickrack on using a matching thread for this.
Sew the side seam, overlock and press. Stitch the top part of the seam flat where the shirring is, this will make sure the seam does not rub when wearing.

Press the hem under and top stitch.
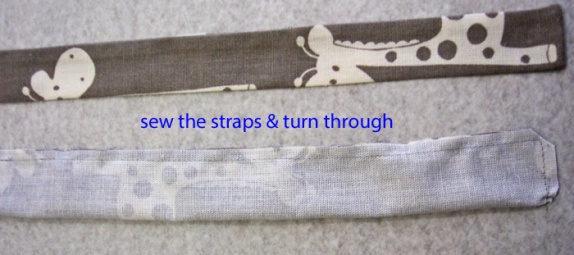
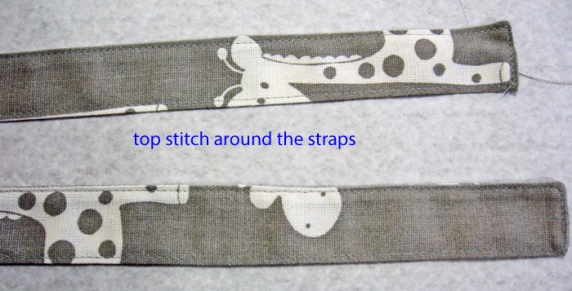
Make the straps: fold the straps in half along the length and stitch around the edge. Clip the corners, turn out through the bottom opening, press to get an even edge. Turn the raw end in and stitch closed or overlock to finish.

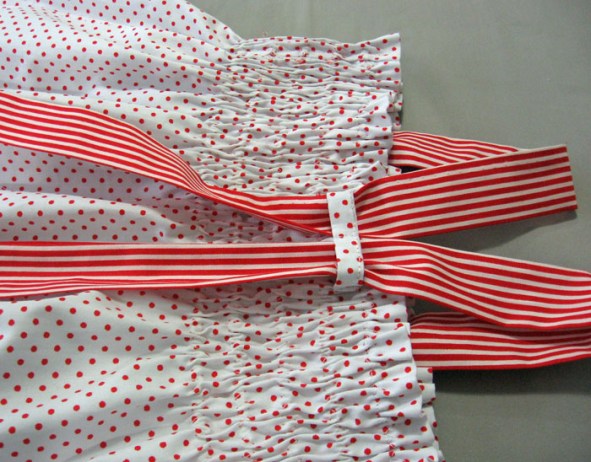
Make the back loop. Double turn the fabric to form a narrow strip and stitch.To attach the loop find the center of the back and pin the middle of the loop in place and stitch down. Stretch the shirring flat and stitch each end of the loop down just below the elastic to form a double loop.
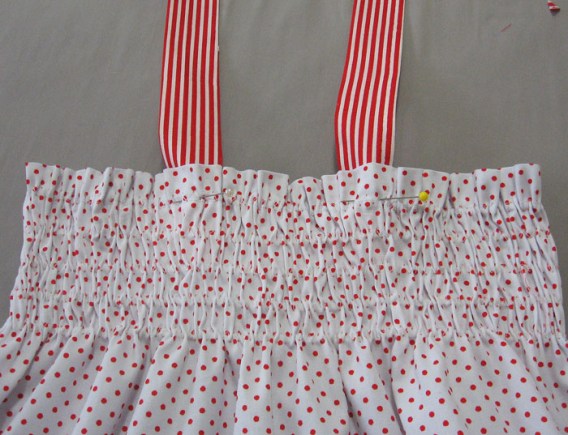
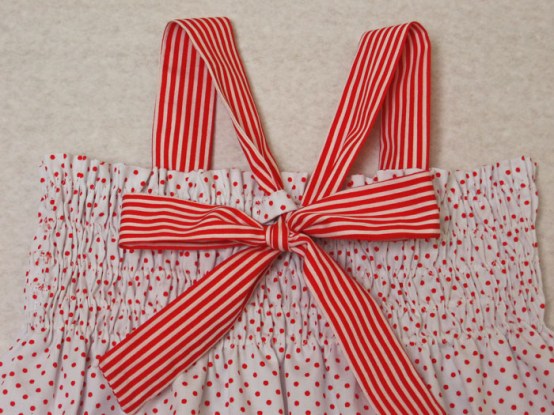
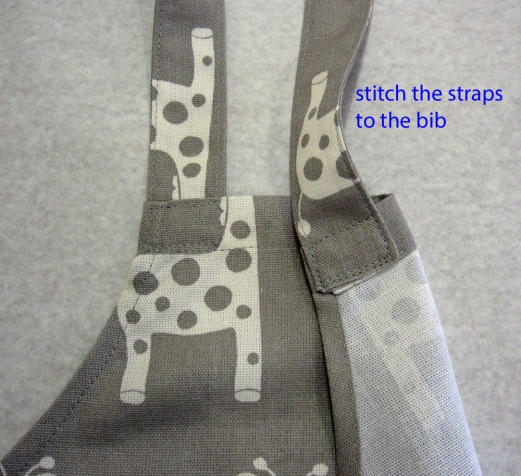
Attach the straps: on the front, locate the center and pin the straps about half way between there and the sides. Sew the straps in place stretch the shirring out when you stitch and sew just above the elastic. Thread the straps through the loops and tie into a bow.
Notes for a Shirred Top
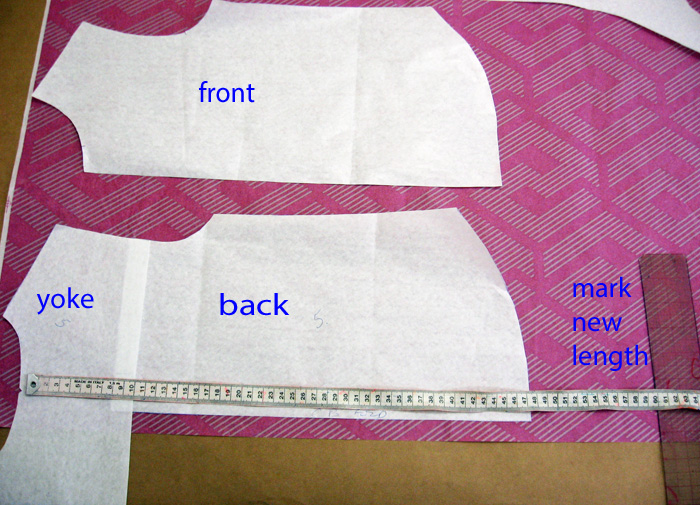
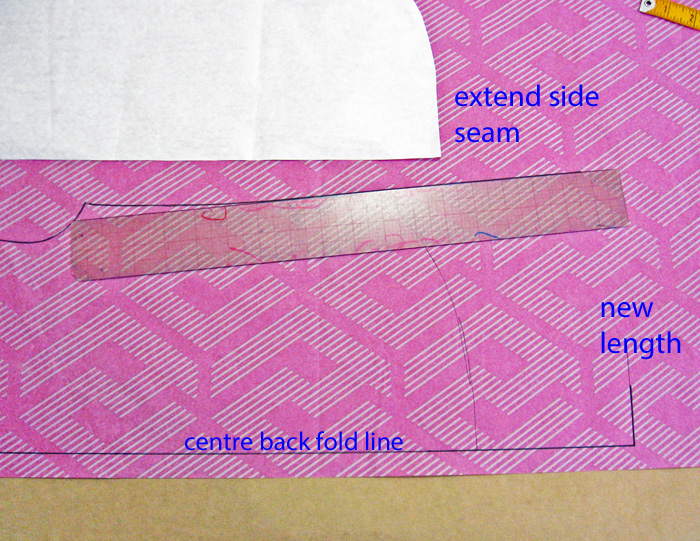
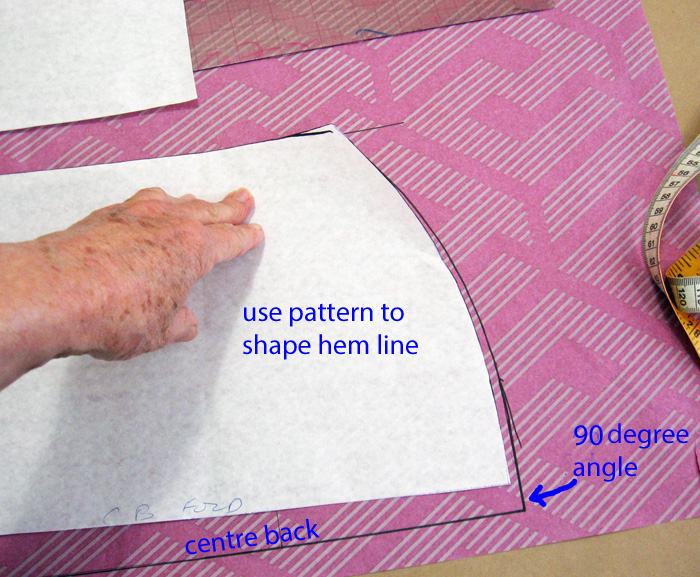
To make the top you can follow all the instructions as given above for the dress. The only difference is that you need to determine what finished length you want your top to be. For my size 6 I halved the length of the dress from 56cm to 28cm [ this includes the hem allowances]. Whatever finished length you decide on you must add 4cm/1.5″ for the hems. You can tie the straps at the back neck halter style or add the loop as shown on the dress to tie the straps at the back bodice.
The shirring rows can also be varied in number and spacing; on my top I spaced my 6 rows 3cm/1.25″ apart.
When plotting out the rows start at the top and space them to fit evenly to end just above the waistline. The number of rows and the width of the spacing will depend on the size you make. You can make a more floaty little top by just doing 2 or 3 rows at the top and leaving most of the body loose. It is easy to add an extra row if needed.
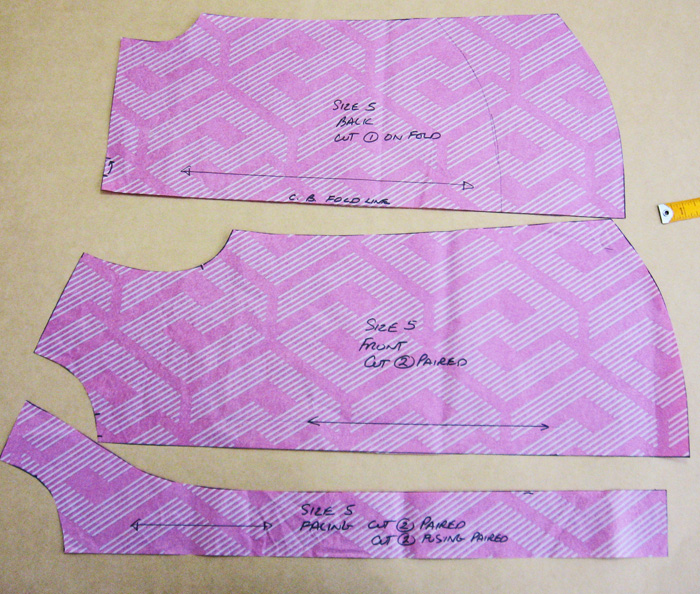
See below for required materials. The main body piece is on the fold.
The lighter the fabric you use the softer and more comfortable the top will be. I used a very lightweight poly cotton. Lawn, voile and poplin are all suitable.
Follow the main tutorial to make the shirring and sew the top together.


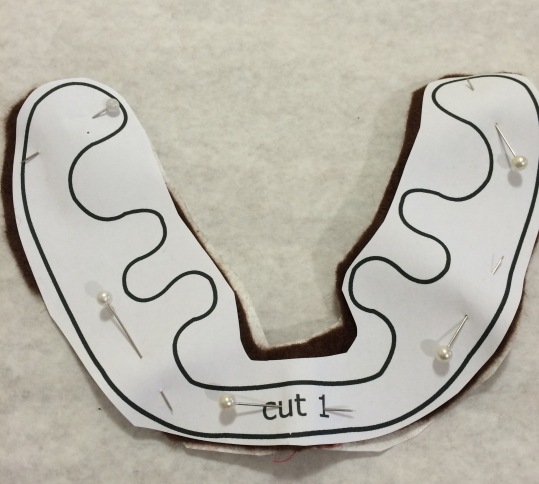 3/ Pin the template in place and using sharp scissors trim the shapes exactly to the template outline. Do this for all the applique parts.
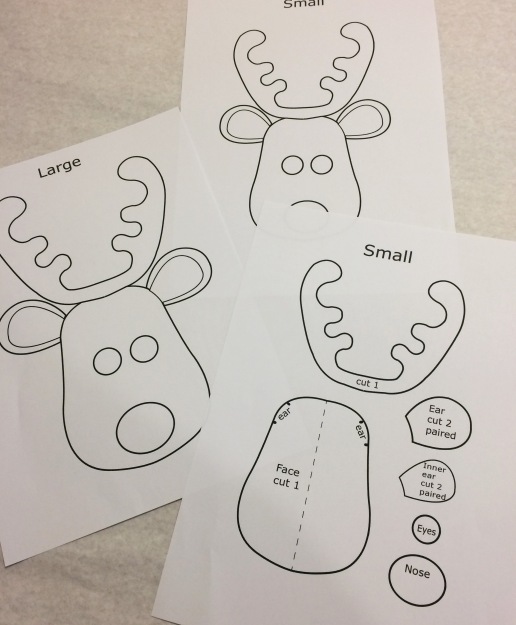
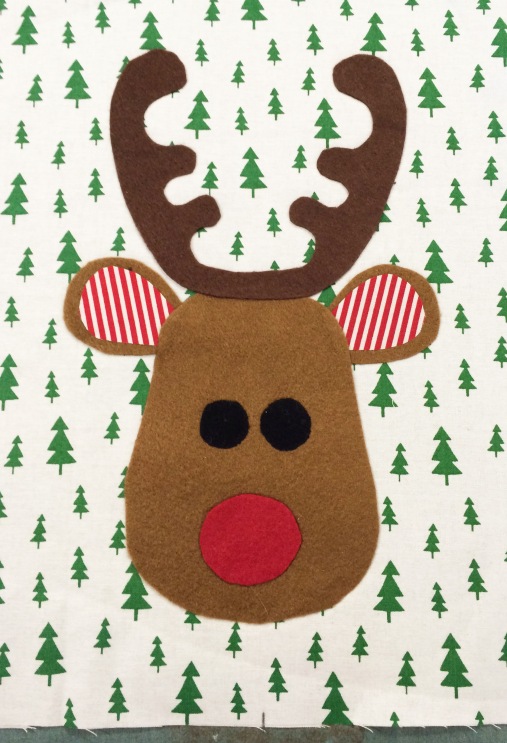
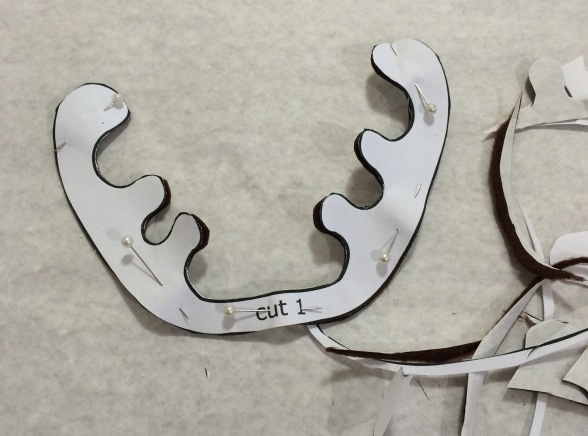 4/ Work out the position for the applique. For my santa sack I placed it in the centre and 3-4cm / 1-1/4″ — 1-1/2″ up from the bottom edge. Use the printed illustration as a guide to layout all the parts correctly.
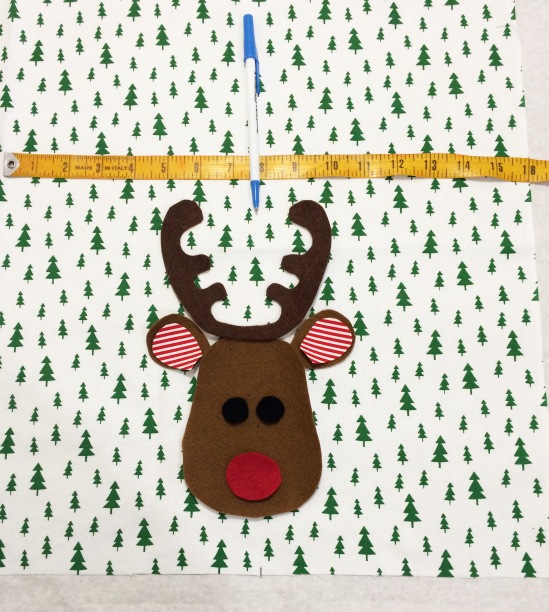
 5/ Fuse the applique parts to the fabric. Peel the paper backing off all the parts. The sequence for fusing on the parts is: ears, face, antlers, nose and eyes. The face should just slightly overlap the ends of the ears and the antlers should overlap the top of the head. Fuse the two ear parts in place first then continue the sequence using a hot iron and pressing cloth. You will need to apply some pressure with the iron.
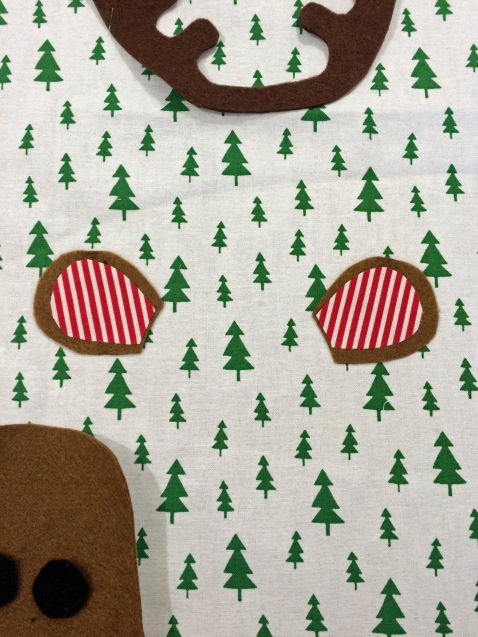
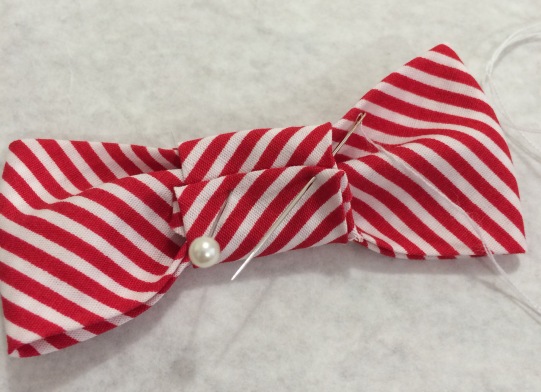
 If you are going to stitch the applique do this now. It is now ready to complete sewing the santa sack. 6/ Make the bowtie. Cut a strip of fabric 8cm X 20cm / 3-1/2″ X 8″ [ I cut the stripes on bias]. Press the edges to the centre and fold over to form a bow shape. Use a small rectangle of fabric for the keeper and wrap this around the bow and stitch by hand. It’s best to attach the bowtie after the bag is sewn together.
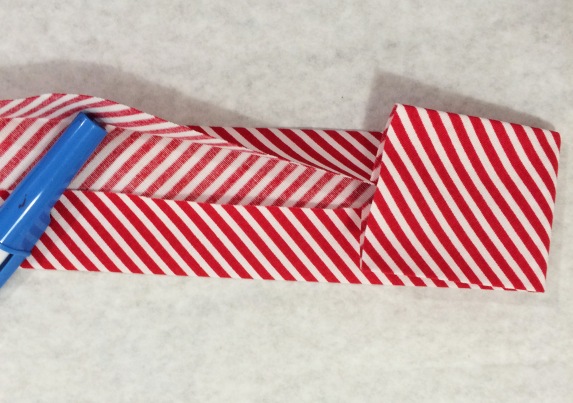
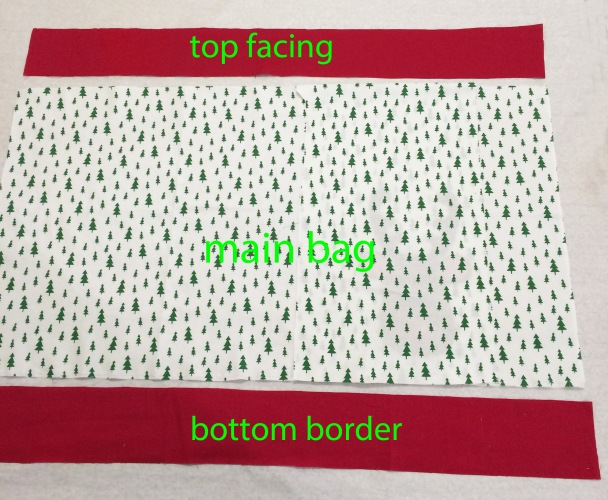 2/ Applique: if using the applique position so that it will be in the centre of one side of the bag and closer to the bottom than top.
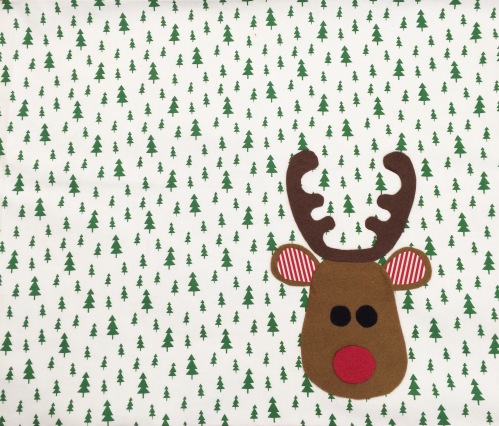 3/ Sew the border to the bottom and the facing to the top edge. Overlock the border seam. Press both seams.
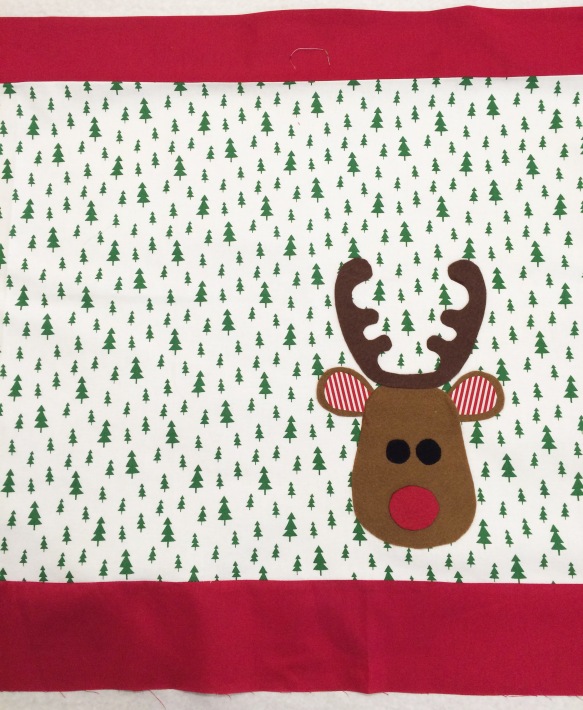 Press the edge of the facing under 1cm / 3/8″. Then turn the facing under and press flat.
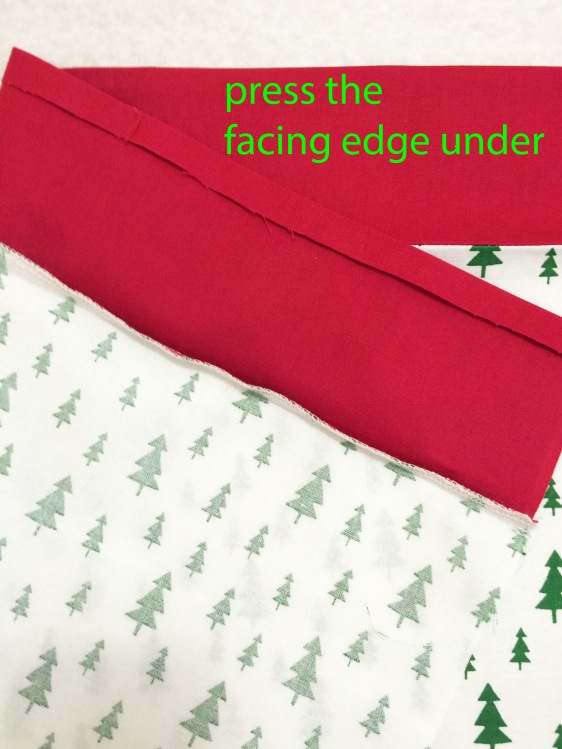 4/ Sew the bag together: fold the whole thing in half or if in two parts place together and stitch to form a bag along the sides and bottom. Overlock or use a zigzag stitch to finish the seams. Turn the bag out and press the seams flat.
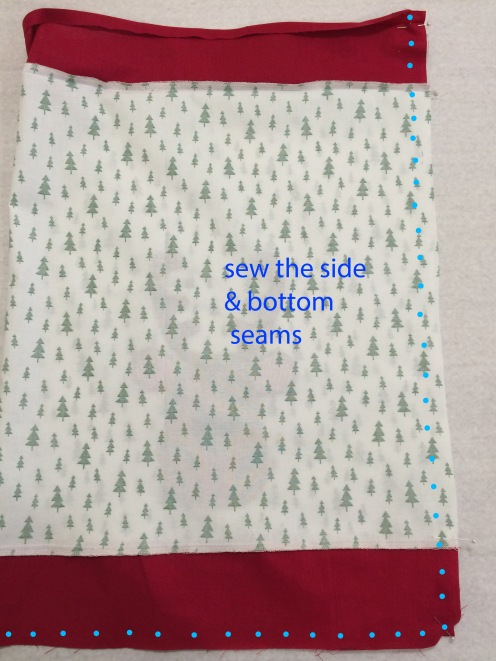 5/ Stitch the facing down: fold the facing to the inside; this should be easy because you have already pressed it under before stitching the bag seams. Press the facing flat, pin to hold and stitch the edge down.
 Turn out and give a final press. 6/ Make the fabric tie: I cut my tie 90cm X 8cm [ 36″ X 3″]. It can be any width or length depending on how large a bow when tied up. Make the tie in the same way as for a belt or strap. Fold the tie in half and stitch with a very narrow seam, leaving a small gap at the centre to turn through. Turn out and press.
 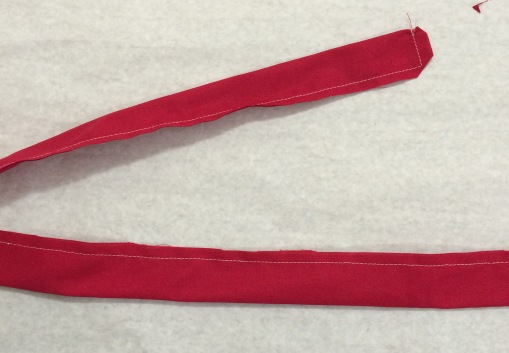 Stitch the centre of the tie to the side seam level with the bottom edge of the facing.
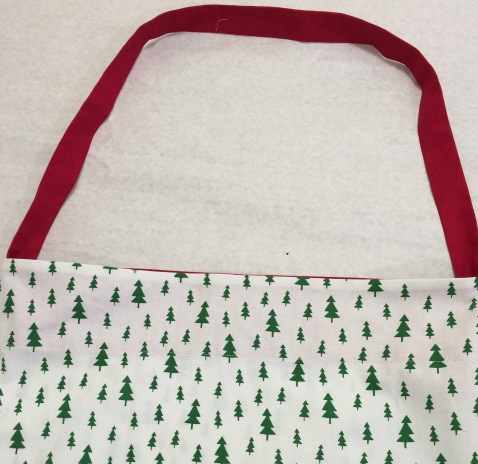
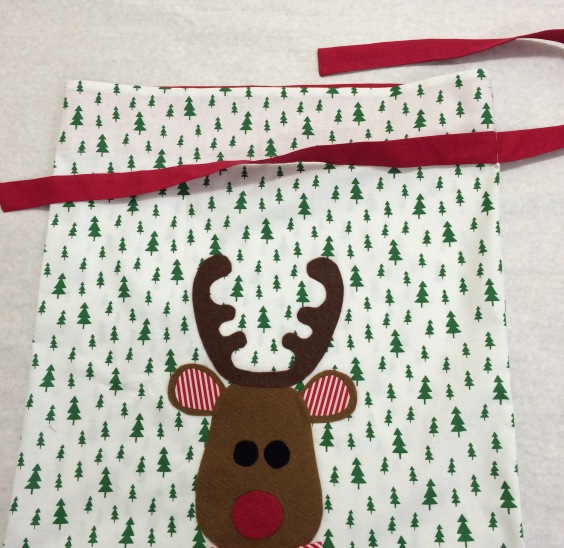 Alternately use a handle or loop to hang the Santa Sacks up.
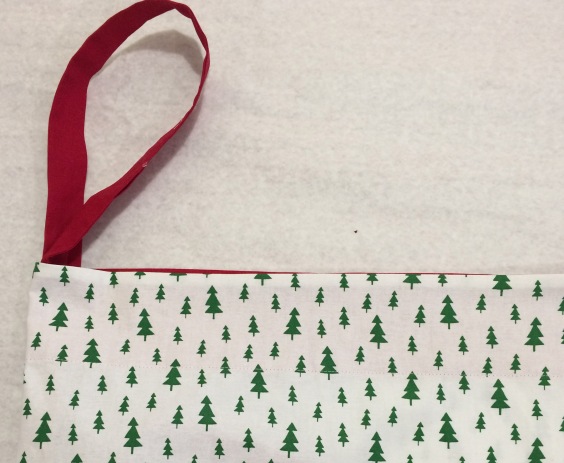
 Stitch on Rudolph’s bowtie and it’s finished.
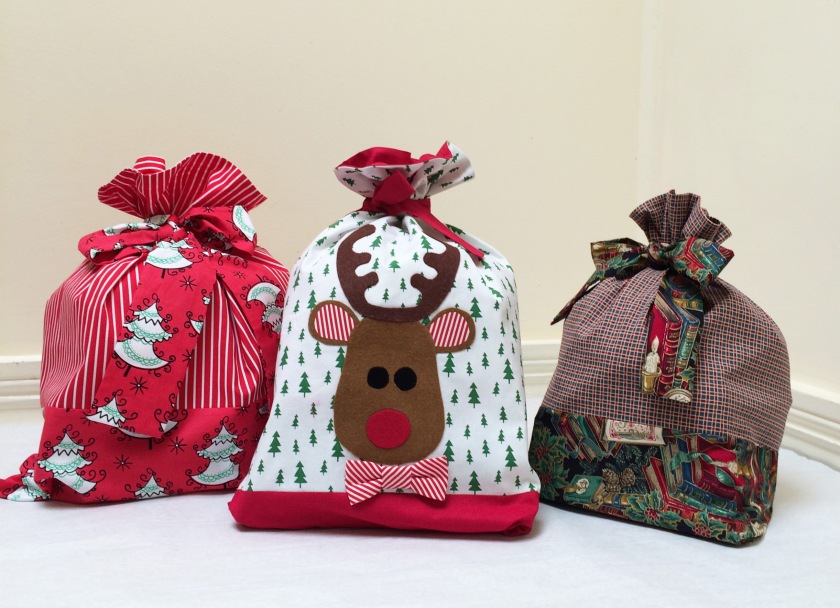
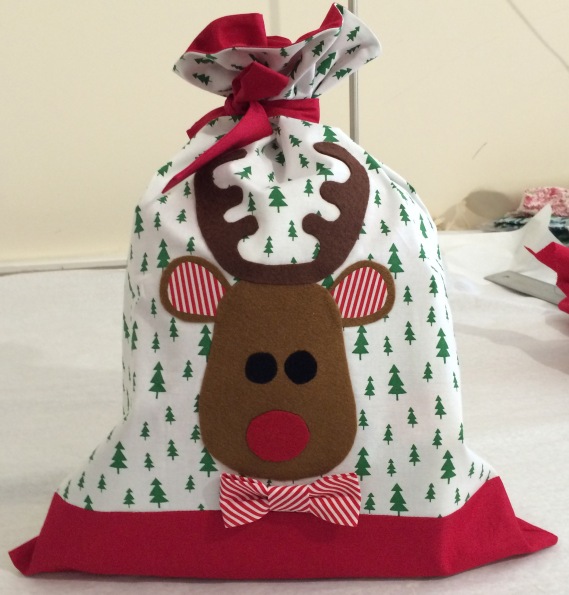 Below are two finished bags made in the same way but in different sizes and with wider borders and larger bow ties. The left hand sack does not have a separate contrast facing but I have cut the main bag section long enough to include a deep 7cm/3″ hem.
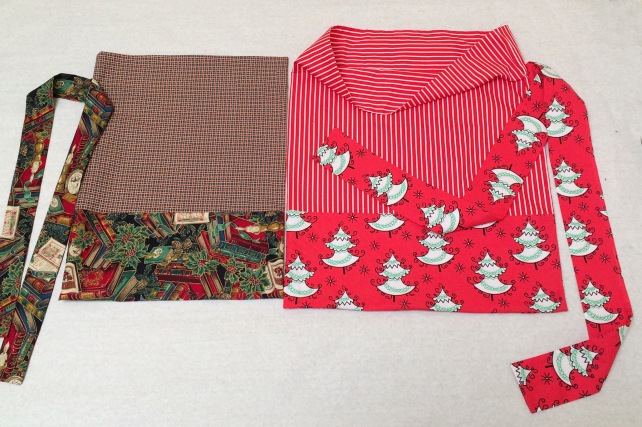


 2/ Cut out the appliqué pattern shapes you want to use and position them on the skirt front to check the size and spacing. See my photo as a guide.


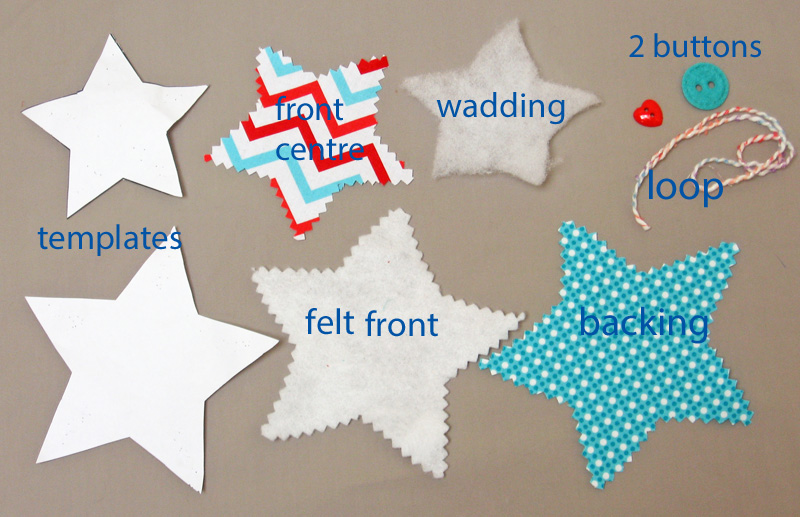
 Check that you have all the pieces for the applique.
 3/ Peel the paper backing off the duck shape. Position the ric-rac and the shapes onto the front skirt remembering to allow for the hem turning. The duck looks best placed off center.
 4/ Use a pin to hold in place till you are ready to fuse. Fuse the main duck shape first and then the beak. Use paper to protect the iron.
 5/ Set the stitch on your machine; you can use a small width zigzag or a satin stitch or your machine might have more options. I used a zigzag stitch set at a small stitch width and short length so the stitches are not too wide and very closely spaced but the effect is not as heavy as satin stitch. The stitching should stay within the edge of the appliqué piece so you get a smooth outline. Use matching thread. For a neat finish pull the threads through to the underside and tie off. 6/ Tie a small ribbon bow and hand stitch to the neck, stick or stitch the eye in place. Finished!
 No Overlocker? Just use the zig-zag stitch on your plain machine to finish the seam edges. 2/ Overlock the hem edge and press the 12mm / ½” hem allowance under. Press the top edge under, double fold in 1cm / 3/8” then 2.5cm / 1” to form the elastic casing channel, do not stitch down at this stage.
 3/ Sew the remaining side seam from top edge to hem edge, overlock and press. 4/ Re-press the hem and casing turnings where needed. Top stitch the hem and the edge of the turned in casing leaving a small gap to insert the elastic near one side seam. 5/ Cut the elastic to the right length for your size; lengths are marked on the pattern. Use a large safety pin to insert the elastic, sew the ends together securely and stitch the gap closed. Finished!

 1/ Prepare the skirt; cut out the skirt front and back. Sew one side seam, overlock and press. Overlock the hem edge and press the hem allowance under. Press the double turned top edge casing allowance under but do not stitch anything down at this stage.
 3/ Stitch the rows of braid and the stem in place with a zigzag stitch using matching thread for each colour.
 4/ Lay out the flower buttons; you can see from the photo how I did mine. You will need to use flat 2 or 4 hole buttons.
 Once I had the layout right I used craft glue to stick the buttons in place. This makes the stitching process so much easier but you must take care to use only a small amount of glue on each button and to not spot the fabric with glue. Put it aside for an hour or two for the glue to dry. If you don’t have glue use a chalk pencil to mark the center of each button.
 5/ Gather up some matching thread, a needle and clippers, make a cup of coffee, put on your favorite music and sit down and sew each button on.
 6/ All you need to do now is finish stitching the skirt. Sew the remaining side seam, stitch the hem and casing, insert the elastic and it’s Finished! For sewing details to finish the skirt see the above tutorial for the Duckie Skirt.

 The Play Pants pattern is a basic pant pattern with a patch pocket in sizes to fit kids from 1 to 10 years old. The pattern includes a simple easy to make Christmas tree appliqué to use on a T shirt or skirt. The pattern is suitable for boys and girls and is ideal for pyjama pants. The basic pattern can be altered to have a cuff or ruffle on the hem. The length can also be adjusted to shorts or 3/4 length pants. This is a very easy pattern, great for beginners.
 Trace out a paper pattern for the size you want following the colour code. You can do this by tracing with a tracing wheel onto plain paper or using see-through baking paper and trace with a pencil. I think it’s easier to use a tracing wheel so invest in one of these. Tracing the pattern out means you can keep the master pattern intact for future use. Please note that all cutting out instructions, seam and hem allowances and grain lines are marked on the pattern.
 It’s very important to get the grain straight when cutting long pants; the best way to get the perfect straight grain is to fold the pattern in half placing the hem edge perfectly square and equal and then press a cease in along the full length of the leg to get the grain line then mark with a pen and ruler.
 Rule a line for the hem turnings and the waist turning these are both 4cm/11/2” wide. Don’t forget the pocket pattern.
 Now the basic pattern is ready to use.
 NOTE: If you would like a ruffled hem follow the instructions as for the cuff but use a single width not double [e.g 38cm x 10cm] and add extra length for gathering — about half to two thirds — so total pattern dimension of approx 57cm x 10cm for a size 2. Label “Cut 2”. OK! this is what you should end up with ———


 Make the Pants: sew the side seams together, overlock and press. Press the waist casing under so you can see how wide the waist band will be.
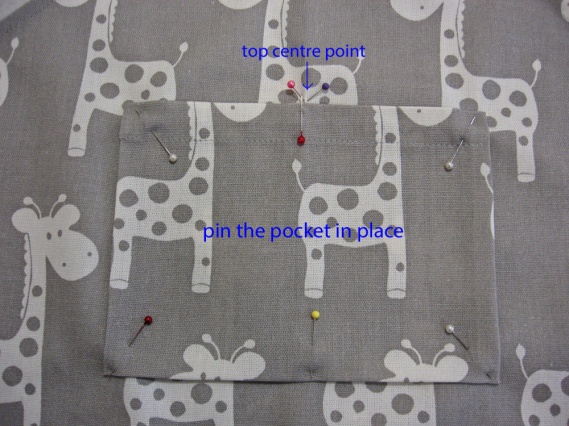
 Place the pockets on the front at least 6 cm below the finished top edge at the side seam position and about 1cm in from the side seam, pin and sew in place. The pocket position will vary with the size so just make sure it looks balanced.
 Sew the centre front and centre back seams, overlock and press. Sew the inside leg seams together matching at the crotch seam, overlock and press.
 Pockets stitched on and seams all sewn together.
 Attach the cuffs: press each cuff in half lengthways, then check that the cuff and leg measure exactly the same and make any necessary adjustments. Sew the cuff seam and press open.
 Fold the cuff in half again and pin to the right side of the leg with the cuff seam at the inside leg seam. Sew in place, overlock and press. On the outside sew a row of topstitching along the seam to hold the seam flat on the underside.
 Make the waist casing: The total width of the casing allowance is 4cm/11/2”. For a neat finish press the edge of the casing under 1cm/3/8” and turn casing under along the finished edge line [you pressed this under earlier]. Sew the casing down and sew a row of stitching along the top edge to give a neater finish after the elastic is inserted.
 FINISHED!

 Next cut a piece of iron-on backing for each shape and iron this onto the back of the fabric shapes; make sure to use a light pressing cloth or some tissue paper to protect the iron and ironing board. Now each shape will have a paper surface on the back. Use the templates and draw the shapes onto the paper backing, cut them out carefully with sharp scissors or pinking shears. If you are hand sewing it’s best to cut with plain scissors.
 Carefully peel the paper backing off and layout the design overlapping each piece a small amount [about 6mm/¼”]; line everything up as though you are following a centre line so you have tree trunk, bottom layer, middle layer, top layer and star. It’s best to do this on the ironing board so there’s no need to move once it’s set in place. When you are happy with the way it looks press it on firmly.
 Now sew around all the edges; use a plain stitch if the edges are pinked or a zigzag if they are plain. To keep it neat stitch each section separately changing thread colour if necessary. Pull the thread ends through to the underside and tie off.
 Makes a cute set of Christmas night pyjamas.


