
If you already own the Tilly Top pattern you will be able to use this tutorial to get more value out of the pattern. If you would like to purchase the Tilly Top pattern just click to go to the SHOP LISTING.
In this tutorial I will show you how to make the Tilly Top pattern into a dress with a contrast border using the bias binding as a trim and also adding some rickrack braid. The original tutorial shows how to make bias binding or you can use ready made bias.
The only part of the pattern to be altered is the main body piece.

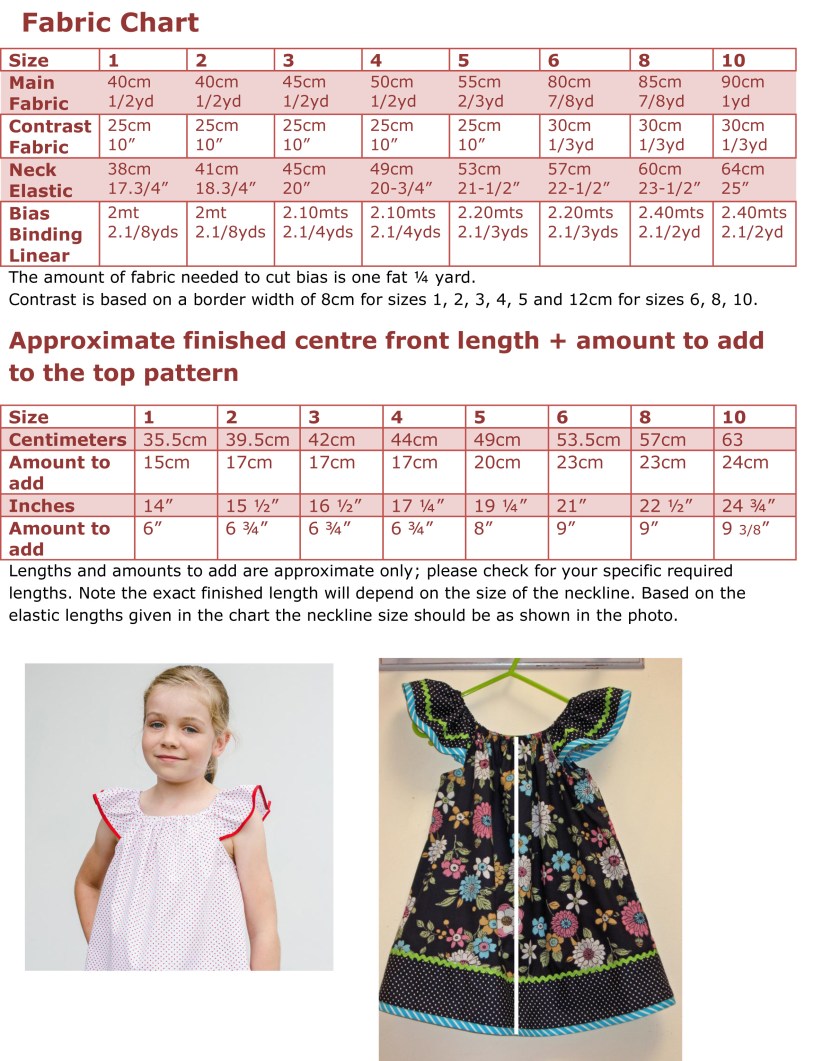
Decide the finished length for the new dress pattern. It helps if you can measure this on the child. The top version sits at about mid hip length so if you mark the waist level at about halfway down the side seam you can calculate how much to add for a finished length about 5cm/2” above the knee. On my size 4 sample I am adding 17cm/6 ¾” to the original pattern length. See the Charts below for approximate finished lengths and amounts to add to the existing pattern. Note: you must add seam allowances to these amounts. I have calculated the fabric lengths based on a cloth width of 112cm/45″.
TRIMS: To complete this project you will also require readymade bias binding with a finished folded width of 1cm/3/8″ or contrast fabric to make your own binding. Ricrack braid; the same length as for the bias. Elastic and matching threads for all parts.

1/ Trace out the size you want onto a clean piece of paper large enough to make the extensions.

2/ Measure down and mark the new length then rule the side seam and centre lines down to this level.

3/ Use the original pattern hem edge to draw in the new hemline so you get the gentle curve. Take care to keep a 90 degree angle at the junction of the centre line and hemline. Now you have a dress length pattern; remember to add a small hem allowance if you are not using bias to bind the hem edge.

4/ To create a contrast border: decide how wide to make the border; this will depend on the size of the dress so just set a width that is a good balance to the overall length. I am using an 8cm/3” wide border which I have marked in red pen; the border line shape must be the same as the hemline. I am using a bias binding on the hem so I don’t need to add a hem allowance.

Cut out the new pattern and make a separate pattern for the border by tracing this out.

Add a 1cm/3/8” seam allowance to the top edge and cut out the new border pattern. I have cut my border as a full piece and labeled it ‘Cut 2 Contrast’.

Next add a 1cm/3/8” seam allowance under the red line on the main pattern and cut off below this. Now you have a new dress length pattern with a contrast border. The sleeve pieces remain unchanged. If you are using the bias pattern to make binding for the skirt hem just add a few extra centimeters for the wider dress hem.
How to make a ruffled hem panel.
To make a ruffled hem panel follow the steps above to create a border then measure the length of the border seam line. My size 4 is about 26cm and I need 1 ½ times the total width for a gathered panel so the total length of a ruffle for the whole front/back will be 78cm.

Draw a long rectangle 78cm X 10cm [8cm + 2cm hem & seam allowance]. Label this ‘Cut 2’ – one for front and one for back.

Photo below shows the new pattern with plain border cut out and ready to sew.

Follow the sewing instructions in the original pattern tutorial. The dress construction is the same as for the top with the addition of the skirt border. I have also added the rickrack trim to the sleeves and to the border seam.
Additional Sewing Notes
Prepare your thread colours and bobbins. I am using 3 different colours because of the contrast bias and rickrack.
Complete STEP 1 in the original tutorial to make the binding.
Using main thread colour: attach the border pieces to the front and back dress pieces, overlock and press the seams. Sew one side seam, overlock and press.
Change thread colour and attach the bias to the hem of the skirt border by following the instructions in STEP 3 of the original tutorial

GO TO STEP 2: sew the bias binding to the sleeve edges.
Change thread colour and stitch the rickrack braid on about 2cm/3/4” in from the bias. A zigzag stitch is best for sewing on rickrack.
Next sew the rickrack along the border seam line on the skirt.
Close-up view of bias binding and rickrack braid.

Change to main thread colour. Sew the remaining side seam closed, overlock and press.
Continue with the original tutorial to complete the dress.

Finished Dress

