How to turn the Willow Shirt into a shirt dress.

How to make the Willow Shirt into a shirt dress by Felicity Sewing Patterns blog.

The Willow Shirt is an all seasons shirt for girls and boys sizes 4 to 14 years. The pattern can be purchased at the SHOP on Felicity Patterns website.

Willow Shirt as a Shirt Dress.

I have always loved shirt dresses; they look so smart but are no-fuss and comfortable to wear. Here’s a quick tutorial to show you how to alter the Willow Shirt pattern to a dress length. You can use a wide variety of fabrics and make it any length you like with long or short sleeves. I recently made a size 12 in chambray for my friend’s granddaughter and added a tie belt. The design details and sewing instructions are the same as for the shirt.

Mia in Willow Dress

To adjust the pattern:

1/ Trace out the complete pattern in the size required. Get a largish sheet of paper to make the new dress length pattern or enough paper to attach an extension to the existing pattern. There are three pattern pieces that will need to be lengthened; the main back, front and facing. All the other parts remain the same.

2/ Get the length measurement for the new dress: the most reliable place to measure length is on the centre back from the cervical bump at the base of the neck down to knee level. Then decide the finished length you would like for the dress; about 6 to 8cm / 2½-3” above the knee is a good length for a young girl. Note the finished length.

3/ Lengthen the back pattern:

1

Place the back yoke and body patterns together overlapping the yoke seam allowance. The edge of the yoke neckline sits at the cervical point on the body so measure down from here and mark the new hem length, add a couple of centimeters for the hem allowance.

2

Remove the yoke pattern and outline around the body pattern, use a ruler to extend the side seam and centre back lines to the new length.

3_edited-1

If you want to keep the curved hem use the existing pattern to draw the new hem line. This will be a little wider now. Take care to get a squared 90 degree angle at the centre back/hem junction.Make sure to mark the tuck notches at the yoke seam. Cut the new pattern out. The hem can be squared off if you prefer by lengthening the side seam to create a straighter hemline.

4/ Lengthen the front and facing patterns.

4

Outline around the front pattern. Mark the notch points on the armhole and neckline.

5

Place the new back pattern against the side seam and draw down so the front is the same length as the back.

6

Rule the centre front line down and use the existing pattern to shape the hem curve. Make sure to get a 90 degree angle at the centre front hem. Cut the pattern out.

7

Outline the facing and place the new front against the facing and draw down to get the new length and cut out.

8

Label the patterns and be sure to mark all the notch points. The dress is ready to cut out now using all the original pattern pieces for collar,sleeves etc.

If you want to add a tie belt simply decide how long and wide you want the finished belt, Use double the finished width for a bagged-out belt, add a small seam allowance and cut out. I also added belt loops to the waist of the dress.

Willow shirt dress

scroll

Tilly Top — how to make the top pattern into a dress with a hem border

How to alter the Tilly Top pattern to make a cute dress with contrast border and trims by felicity Sewing Patterns.

If you already own the Tilly Top pattern you will be able to use this tutorial to get more value out of the pattern. If you would like to purchase the Tilly Top pattern just click to go to the SHOP LISTING.

In this tutorial I will show you how to make the Tilly Top pattern into a dress with a contrast border using the bias binding as a trim and also adding some rickrack braid. The original tutorial shows how to make bias binding or you can use ready made bias.

The only part of the pattern to be altered is the main body piece.

Tilly Dress sewing pattern by Felicity Patterns

Decide the finished length for the new dress pattern.  It helps if you can measure this on the child. The top version sits at about mid hip length so if you mark the waist level at about halfway down the side seam you can calculate how much to add for a finished length about 5cm/2” above the knee. On my size 4 sample I am adding 17cm/6 ¾” to the original pattern length. See the Charts below for approximate finished lengths and amounts to add to the existing pattern. Note: you must add seam allowances to these amounts. I have calculated the fabric lengths based on a cloth width of 112cm/45″.

TRIMS: To complete this project you will also require readymade bias binding with a finished folded width of 1cm/3/8″ or contrast fabric to make your own binding. Ricrack braid; the same length as for the bias. Elastic and matching threads for all parts.

Tilly Dress Charts

Blog post for the Tilly Dress sewing pattern by Felicity Patterns

1/ Trace out the size you want onto a clean piece of paper large enough to make the extensions.

Blog post for the Tilly Dress sewing pattern by Felicity Patterns

2/ Measure down and mark the new length then rule the side seam and centre lines down to this level.

Blog post for the Tilly Dress sewing pattern by Felicity Patterns

3/ Use the original pattern hem edge to draw in the new hemline so you get the gentle curve. Take care to keep a 90 degree angle at the junction of the centre line and hemline. Now you have a dress length pattern; remember to add a small hem allowance if you are not using bias to bind the hem edge.

4

4/ To create a contrast border: decide how wide to make the border; this will depend on the size of the dress so just set a width that is a good balance to the overall length. I am using an 8cm/3” wide border which I have marked in red pen; the border line shape must be the same as the hemline. I am using a bias binding on the hem so I don’t need to add a hem allowance.

5

Cut out the new pattern and make a separate pattern for the border by tracing this out.

6

Add a 1cm/3/8” seam allowance to the top edge and cut out the new border pattern. I have cut my border as a full piece and labeled it ‘Cut 2 Contrast’.

7

Next add a 1cm/3/8” seam allowance under the red line on the main pattern and cut off below this. Now you have a new dress length pattern with a contrast border. The sleeve pieces remain unchanged. If you are using the bias pattern to make binding for the skirt hem just add a few extra centimeters for the wider dress hem.

How to make a ruffled hem panel.

To make a ruffled hem panel follow the steps above to create a border then measure the length of the border seam line. My size 4 is about 26cm and I need 1 ½ times the total width for a gathered panel so the total length of a ruffle for the whole front/back will be 78cm.

8

Draw a long rectangle 78cm X 10cm [8cm + 2cm hem & seam allowance]. Label this ‘Cut 2’ – one for front and one for back.

9

Photo below shows the new pattern with plain border cut out and ready to sew.

layout

Follow the sewing instructions in the original pattern tutorial. The dress construction is the same as for the top with the addition of the skirt border. I have also added the rickrack trim to the sleeves and to the border seam.

Additional Sewing Notes

Prepare your thread colours and bobbins. I am using 3 different colours because of the contrast bias and rickrack.

 Complete STEP 1 in the original tutorial to make the binding.

Using main thread colour: attach the border pieces to the front and back dress pieces, overlock and press the seams. Sew one side seam, overlock and press.

Change thread colour and attach the bias to the hem of the skirt border by following the instructions in STEP 3 of the original tutorial

11

 GO TO STEP 2: sew the bias binding to the sleeve edges.

Change thread colour and stitch the rickrack braid on about 2cm/3/4” in from the bias. A zigzag stitch is best for sewing on rickrack.

Next sew the rickrack along the border seam line on the skirt.

Close-up view of bias binding and rickrack braid.

Blog post for the Tilly Dress sewing pattern by Felicity Patterns

Change to main thread colour. Sew the remaining side seam closed, overlock and press.

Continue with the original tutorial to complete the dress.

Blog post for the Tilly Dress sewing pattern by Felicity Patterns

Finished Dress

scroll

Christmas Ornaments free pattern and tutorial

Free pattern templates and tutorial for Christmas ornaments by Felicity Patterns

The pattern templates for the Christmas Decorations can be downloaded from the SHOP just select free patterns from the Menu.

Here is the tutorial for the free pattern download for four quick and easy to make Christmas tree ornaments. Tree ornaments can be expensive to buy and it is fun to make your own; mine didn’t cost me anything as I simply used materials that I already had left over from previous projects.

1

To Make the Christmas Ornaments.

You will need some pieces of felt, print fabrics, polyester wadding, assorted buttons, lace, braids or ribbons, beads to thread, bells, sewing threads, fine string or thick thread for stringing beads. Tools required include pinking shears, plain scissors, regular size hand sewing needle and large eyed needle for threading beads, pins, craft glue, sewing machine and iron. You can also add stick-on sparkly thingies to catch the light and make them twinkle.

I have made my ornaments the quick way sewing by machine but if you are an experienced crafter you might like to sew them by hand. I have used pinking shears to cut out for machine sewing but if you are over-stitching the edges by hand cut them out with plain shears.

The tutorial shows how to construct the star and string 3 together with beads to make a long hanging ornament. All the ornaments are basically constructed in the same way so follow the star tutorial to make the boot, bell and ginger bread man. Any trimmings that need to be machine stitched onto the backs or fronts of the shapes is best done before joining at the edges. Hand sewing or gluing buttons, beads etc should be done after the shapes are sewn together with the wadding inside. For the single ornaments a hanging loop can be stitched in when sewing the parts together.

Making the ornaments:

Print and cut out the templates; for the stars cut out both sizes.

The photo shows the basic components for one ornament: felt front piece, print centerpiece, backing print, wadding, centre buttons and string for hanging.

11


Using pinking shears cut the large star in felt and backing print and use the small star to cut the print fabric for the centre front and the wadding.

Below are all the parts needed for the 3 star ornament, plus you will also need to add 3 more buttons for the backs of the stars.

1

Sew the smaller centre print star shape onto the larger felt shape using a plain machine stitch.

Make a sandwich with the backing, wadding and felt, pin to hold and stitch together around the edges.

4

3
 When all 3 stars are sewn together lay out so there is a point at the top, space about 5cm/2″ apart. Roll out a length of heavy thread for the beading, long enough to have a tail at the bottom and a hanging loop at the top. Count out an equal number of beads for the spaces between the stars and enough for the tail and loop.
5
 Start threading by tying a large tinkle bell to the end of the tail thread, thread the top end through a large eyed needle and thread the tail-end beads on from the top end.
6
 When the tail section is threaded insert the needle into the bottom of the first star and push through the inside and out at the top point of the star. Thread the next section of beads including a smaller bell and so on till each section is done.
8
 When you get to the top loop, thread the last lot of beads finishing with a tinkle bell and tie the thread of in a large loop.
9
To finish hand stitch a button to the centre front and back of each star.
10
Back side of stars
Xmas ornaments
Front side of stars
1
All the ornaments are made using the same method as for the star.

scroll

Free Pattern! Cross-back Apron for Mothers and Daugthers

Free Pattern. Easy to make the Cross-Back Apron for adults and children by Felicity Sewing Patterns

Welcome to the Cross-back Apron free pattern download. To get your free pattern download go to the SHOP, select Free Patterns from the Menu and put the pattern in your cart and “buy” it for free.

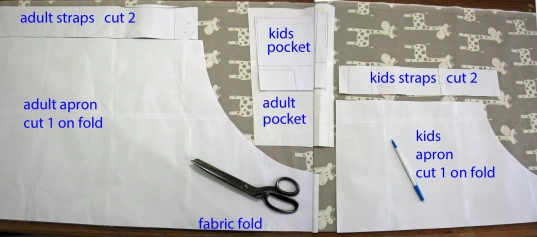
In the pattern file you will find two separate patterns for the adult and kids aprons; please print each pattern separately to save confusion. This file contains only the patterns and instruction sheets for printing and assembling the patterns the sewing tutorial is posted here on Felicity Sewing Patterns BLOG.

Crossback-Apron-front-back

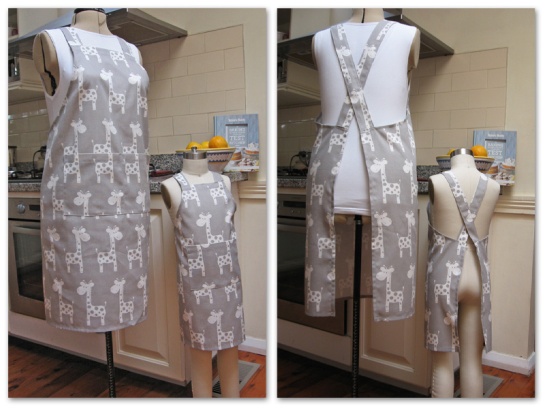
Description: This is by far my favourite apron style; it covers everything and is easy to slip in and out of with no ties just simple cross-over straps. It has a large pocket at the front which also gives extra reinforcement just where the apron gets the most wear. For the apprentice chef in your life there is the kid’s version which is identical to the adult shape but comes in sizes to fit kids aged from about 4 to 10 years old. The fit is very flexible and getting it just right depends on adjusting the finished strap length to your perfect fit. The Apron is very quick and easy to sew, a perfect project for beginners.

Sizes: Both patterns come in sizes small, medium and large. Check the size chart for a guide to the best size to use. Please note the adult pattern must have extra length added to the bottom edge.

Fabric: I prefer to use a heavier weight cotton or poly/cotton for a kitchen apron so a cotton drill or ducking is suitable; denim is also a great choice. I have used a cotton furnishing fabric which has the added benefit of being a wider width at 124cm/49”. See the fabric chart for amount required. The only other thing you need is matching thread.

Crossback Apron Size Charts


Follow the instructions in the pattern file to print and assemble the patterns and check the size chart for the best size to use. The size chart gives a guide to the approximate body size for the small, medium and large sizes for both kids and adults.

Cutting Guide:

The adult pattern must have extra length added to the bottom edge: I added an extra 16cm/6 ½” inches to my medium size apron so that it reaches just past knee level.

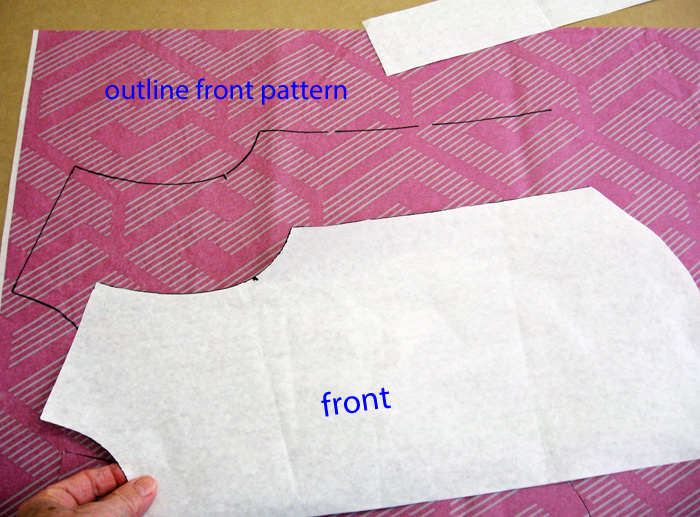
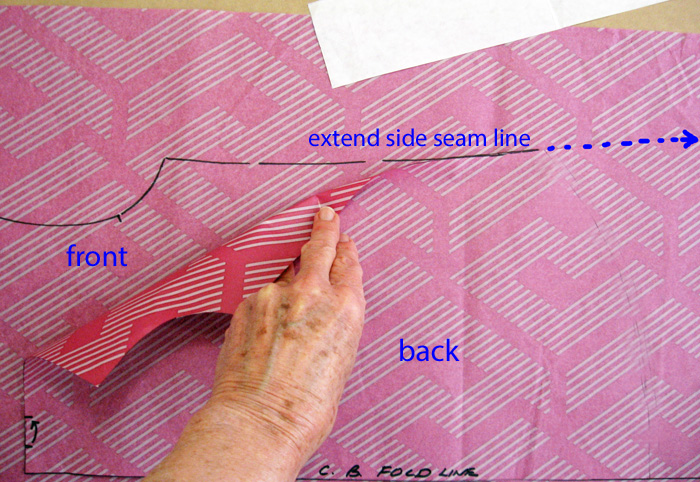
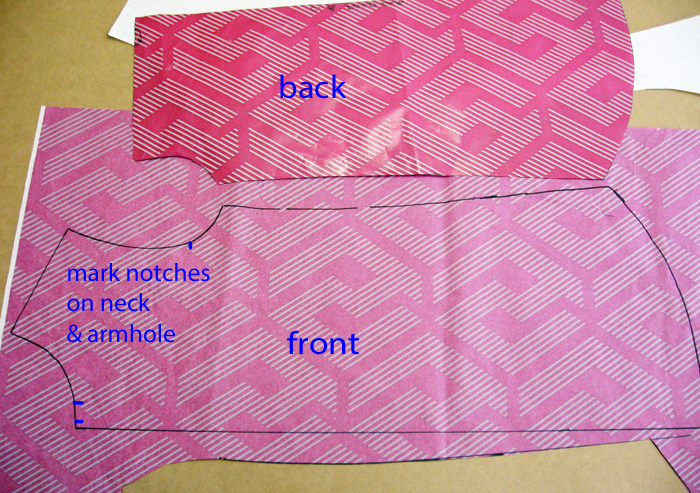
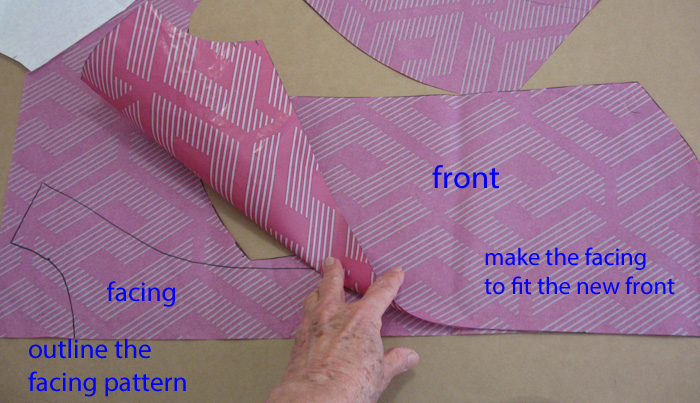
The pattern is easy to adjust if required; length can be added or reduced at the hem and the sides can be extended for more wrap at the back. Extra length is included on the strap pattern so that you can adjust the straps to suit your own height. It is best to trace the pocket patterns out as full pieces. Follow the cutting instructions on the pattern. When laying up the patterns to cut out check that the fabric print is not a one-way print if this is the case you must place all the patterns in the same direction. Make sure to clip the notch marks for the hem turnings. If you are tall it might be wise to add extra length to the straps as this can be adjusted later.

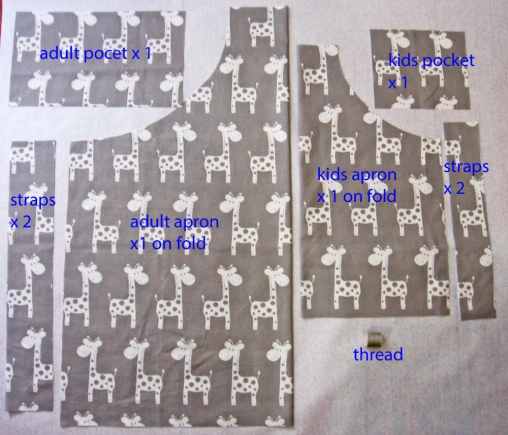
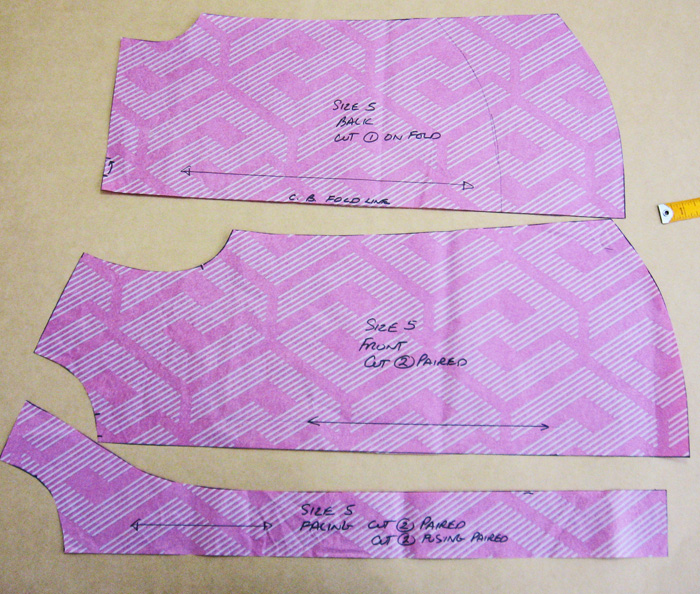
I had to join two photos to get the whole layout in.

Layout


Everything cut out and ready to sew for adult & child aprons in size medium.

1

Sew the Apron

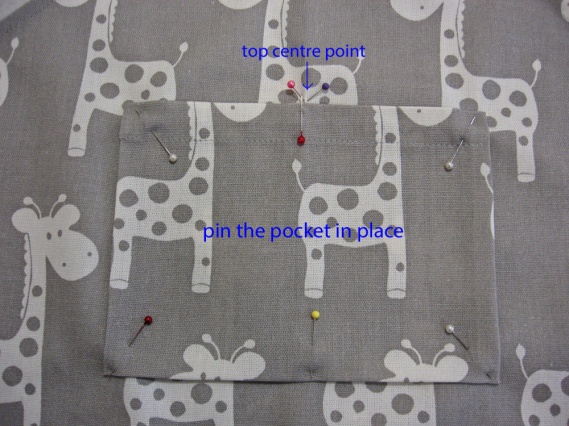
Before you start mark the centre top position for the pocket. On the centre front fold edge of the apron pattern you will see a notch mark for this so put a chalk mark or pins to mark this point on your apron front.

2


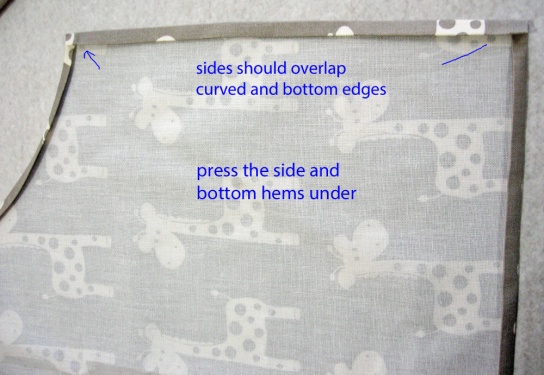
1/ All the edges except the bib have a 2cm/3/4” hem allowance. Press the hem allowances under with a double turn using a fairly hot iron depending on the fabric you are working with.

Start with the curved side edges and press under 1cm then turn again 1cm and press. The bias grain on the edge will allow the hem to turn without buckling but take care not to over stretch. Sew down. Next press the bib hem edge under 1cm and again 2.5cm and stitch down.

3


Go to the bottom hem edge and press this under 1cm and 1cm then do the same on the side edges. You should have a double turned hem all around with a finished width of 1cm/3/8”. Sew down all around.

4


2/ Make the pocket.

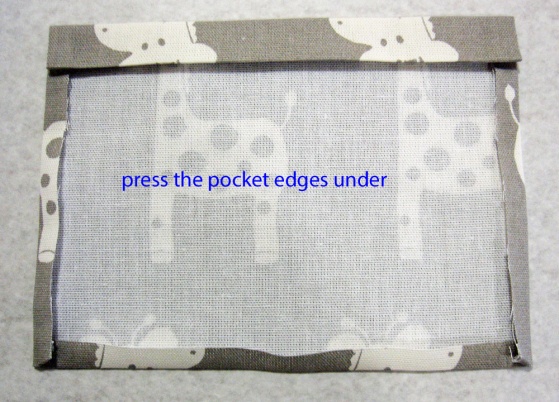
Press a 1cm/3/8”single turning on the sides and bottom edges, then press the top edge under 1cm/3/8” and again 2cm. Stitch the top hem down. You can overlock the edges but I didn’t bother.

5


Position the pocket on the front of the apron using the centre point you marked earlier. Place the centre of the pocket’s top edge at the mark and ensure that the pocket is perfectly squared up to the hem and side edges of the apron. Pin to hold in place and stitch on close to the edges making a couple of double reverses at the two top corners for extra strength. The pocket can be divided into two by sewing through the centre from top to bottom. The kid’s pocket is best left as one large pocket.
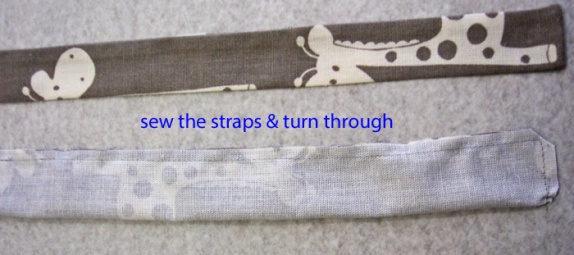
6


3/ Make the straps.

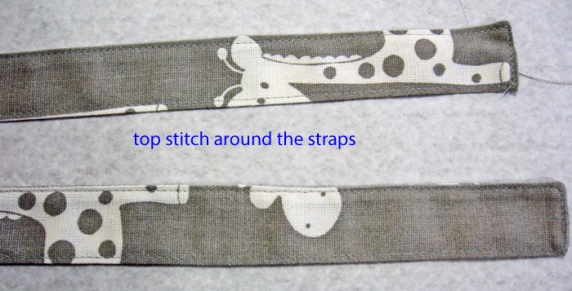
Fold the straps in half with wrong side out and sew along the length, leave a 3cm gap midway to turn out; sew across both ends. The seam allowance is 6mm/1/4”. Turn the straps through and press to smooth out the seams. Hand stitch the gap closed or sew a top stitch around the entire strap close enough to the edge to seal the gap.

7


8

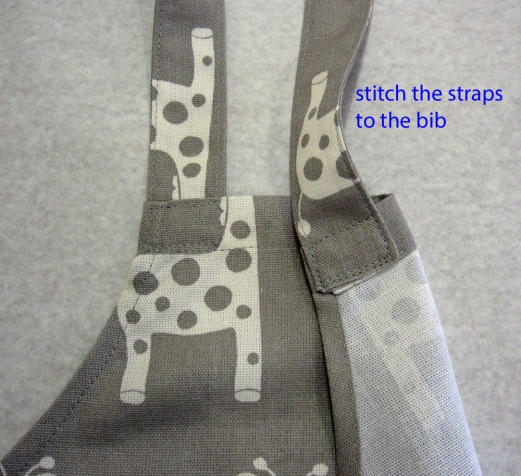
Attach the strap ends to each side of the front bib stitching securely to hold. There is a 2cm/3/4″ allowance for this.

9


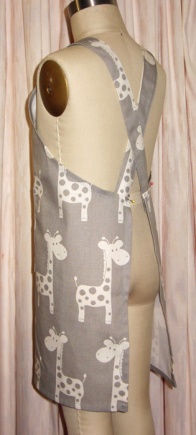
Cross the straps over and pin the ends to the back corners of the apron. The straps should be longer than required so start by pinning them so that there is about 4cm/1 ½” excess.

10


Now it is best to try the apron on to be sure to get the correct strap length for your height. To get the correct fit the bib should be fairly high on the chest and the apron should fall and wrap smoothly around the hips without any dragging or excessive gape at the curved side edges although there will be some gape here as there are no darts to shape the edge to the body. Take a close look at the finished photos to see how it should look. If the back of the apron is swinging forward the straps are too long and if the back is pulling up or the sides are gaping a lot then the straps are too short. Don’t make the straps too short or  it will be difficult to get the apron on and off.

Correct strap length. = minimal gapping and no swinging or dragging.

11a 13


If you are making for gifts or to sell then attach the strap with a 2cm allowance at the front and with an excess of 4cm/1 ½” at the back.

It is also possible to make adjustable straps by using a slide buckle attached at the front bib. Add extra length to the straps for this.

I hope you all enjoy your aprons! I love mine and plan to make more for friends and family.

Crossback Apron front back

scroll

Santa Sack Sewing Tutorial and Free Applique

Christmas Santa Sack sewing tutorial plus applique design by Felicity Patterns

You can download the Santa Sack tutorial pdf file including the Rudolph applique template from the SHOP go to the Free Patterns shop section on the Menu. The tutorial can be viewed here on the Blog page.

A santa sack can be made any size and with a combination of fabrics plus there is the new free ‘Rudolph’ applique that can also be added to make a fun looking santa sack. The applique can be used in a multitude of ways e.g. on clothing, aprons, cushions, bags etc.

I have made my sacks using two contrasting fabrics but you can make them all in one fabric or using multiple combinations. You can also add braid trims, bells, bows or anything you fancy. I’ve made three sacks to demonstrate; one version has the applique.

3 Santa Sacks smaller

MAKE THE RUDOLPH APPLIQUE

The Rudolph applique comes in two sizes but it can be altered to any size by using the photo copy function on a printer to reduce or enlarge the parts.

MATERIALS REQUIRED TO MAKE THE APPLIQUE

1/ Print out the template pages from the pdf file. Choose the most appropriate size to use.

2/ Fabric in small quantities for the component parts: best fabrics to use are wool felt or solid cottons since they will need to take a hot iron to fuse the applique. Check the template and the photos to see what you will need. I used wool felt for the main parts and added some cotton stripe to the inner ears and for the bow tie. You can use plastic goggle eyes if you prefer.

3/ Applique adhesive backing; about 20cm/ 8″ square. You can buy this at fabric and craft stores.

4/ Printer, sharp scissors, an iron and pressing cloth, a needle and thread, pins.

5/ Cut out the parts for the santa sack as required and press smooth. See below for cutting out and making the santa sacks.

I did not stitch my applique onto the bag as I would have done if I was applying it to clothing where it would get a lot of wear and washing. to see how to stitch an applique by machine take a look at the DUCKIE SKIRT TUTORIAL on this blog page. The other option if you like a handcrafted finish is to attach it with a fine hand stitched blanket stitch around the edges.

1/ Print out the template.

12/ Roughly cutout the shapes in fabric and adhesive backing. Fuse the fabric [felt] and adhesive with a hot iron. Use a pressing cloth to protect the iron.

2
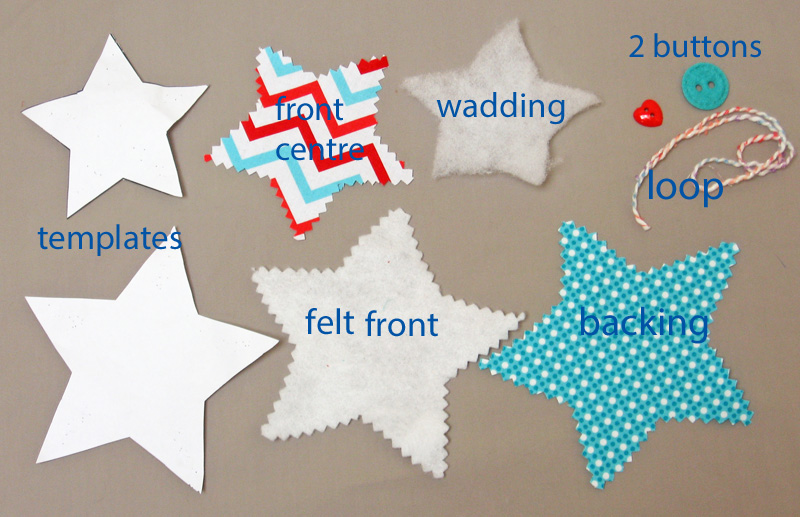
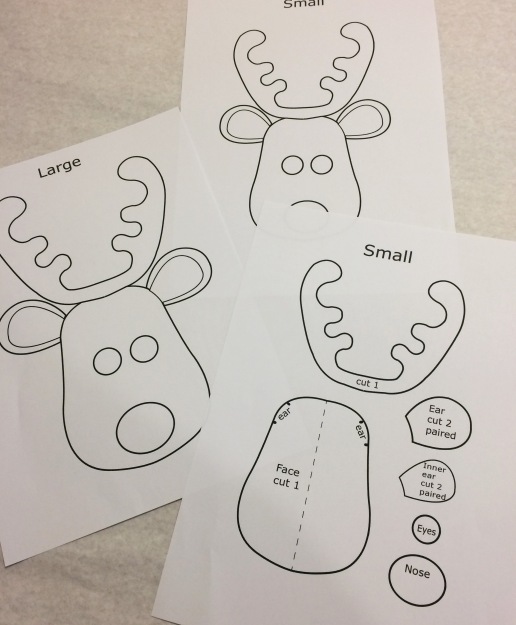
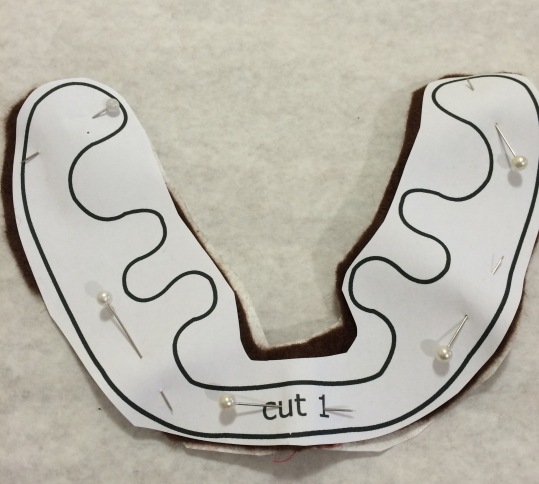
3/ Pin the template in place and using sharp scissors trim the shapes exactly to the template outline. Do this for all the applique parts.

3
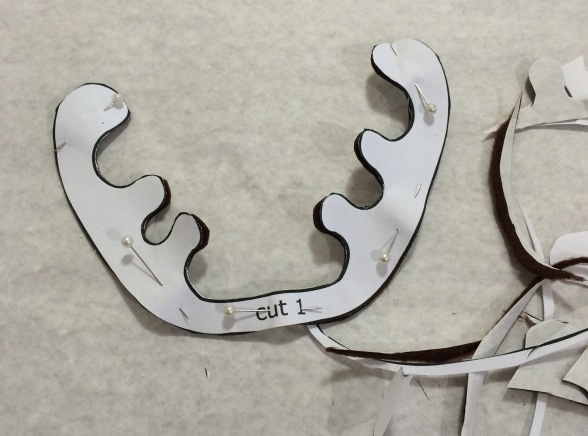
4/ Work out the position for the applique. For my santa sack I placed it in the centre and 3-4cm / 1-1/4″ — 1-1/2″ up from the bottom edge. Use the printed illustration as a guide to layout all the parts correctly.6 position
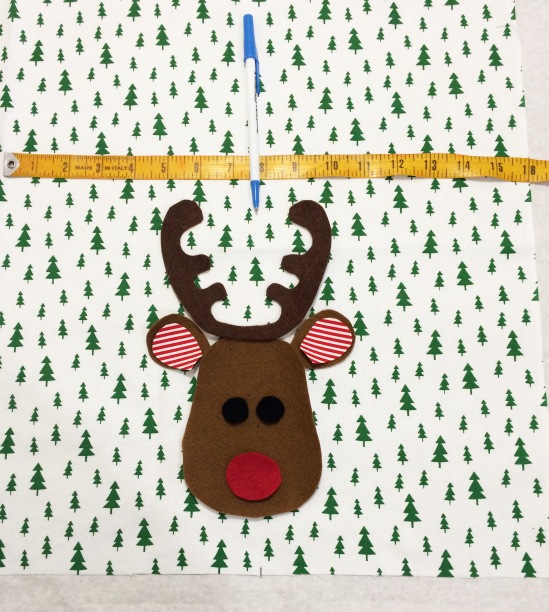
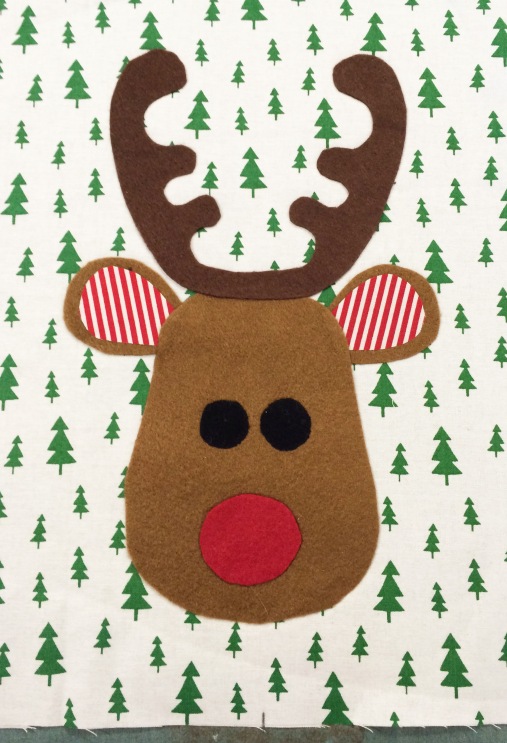
5/ Fuse the applique parts to the fabric. Peel the paper backing off all the parts. The sequence for fusing on the parts is: ears, face, antlers, nose and eyes. The face should just slightly overlap the ends of the ears and the antlers should overlap the top of the head. Fuse the two ear parts in place first then continue the sequence using a hot iron and pressing cloth. You will need to apply some pressure with the iron.
710
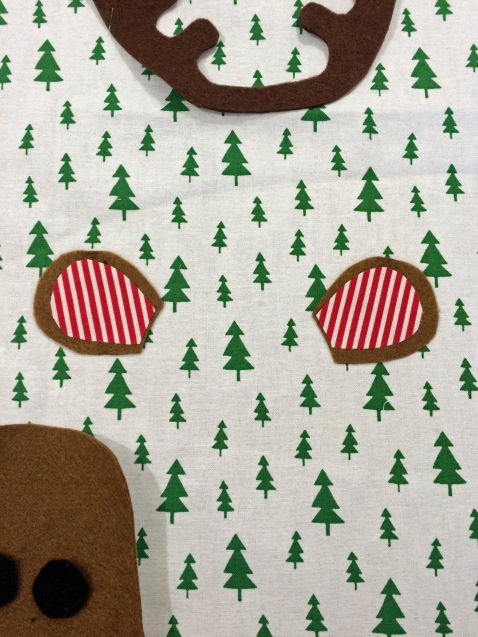
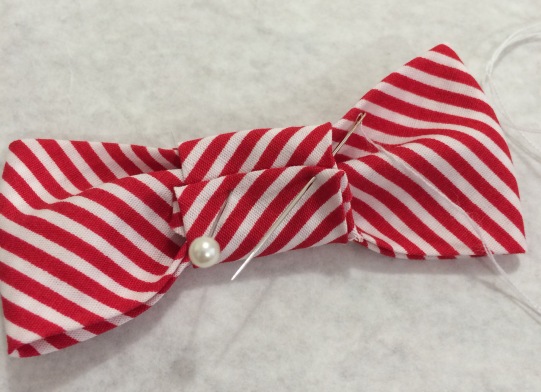
If you are going to stitch the applique do this now. It is now ready to complete sewing the santa sack.                                                                                                                                           6/ Make the bowtie. Cut a strip of fabric 8cm X 20cm / 3-1/2″ X 8″ [ I cut the stripes on bias]. Press the edges to the centre and fold over to form a bow shape. Use a small rectangle of fabric for the keeper and wrap this around the bow and stitch by hand. It’s best to attach the bowtie after the bag is sewn together.1617


MAKE THE SANTA SACKS  The Santa Sacks can be made any size or shape depending on what you want to fill them with: large enough to stuff with toys or small and delicate, just the right size for a bottle of perfume, a jewelry box or a mobile phone. The basic sack is a simple rectangle of fabric sewn together to form a bag with a facing or a deep hem allowance on the top opening. I have made all my bags using two prints but you can vary this to suit. I have added ties to all my bags.


 MATERIALS REQUIRED.

1/ Fabric: the amount will depend on the size of the bag so it’s best to work out the overall finished size of the sack first. It’s a good idea to draw this out on paper and then devide it up for a border or whatever combination of fabrics you want to use. Remember to add seam allowances to panels or borders. Fat quarters can work well for the sacks. If you want to make fabric ties include enough for these depending on the width and length of the finished tie.

2/ Thread for sewing.

3/ Trims: optional: add braid or ribbon trims or other decorative effects. Note: you can make the ties or handles using the fabric as I have done or use tape or ribbon instead.

4/ Sewing machine, scissors, pins, tape measure/ruler, iron, paper.

—————————————–

1/ Cut out the sack: I had large enough pieces of fabric to cut my bag in one continuous piece but it can be cut in two parts as in a back and front. The overall finished size of this bag is 50cm high X 40cm wide [approx. 20″ X 16″]. The finished width must be doubled when cutting all in one piece and seam allowances added. I divided the length for a contrast border 8cm / 3″ wide. The facing is 7cm / 2-3/4″  wide or it can be a little wider for a large bag. Alternately allow for a deep hem on the top if you don’t want a contrast facing.fabric parts
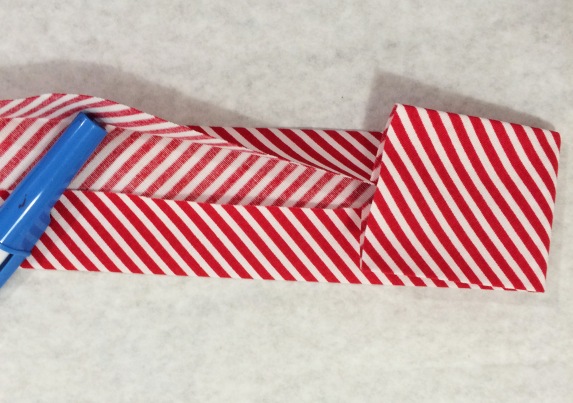
2/ Applique: if using the applique position so that it will be in the centre of one side of the bag and closer to the bottom than top.position
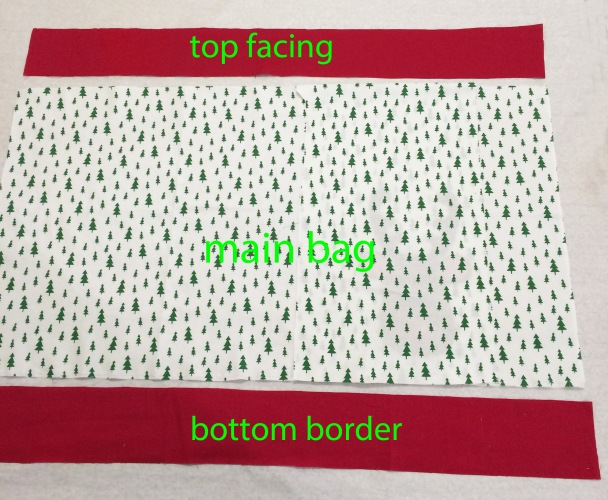
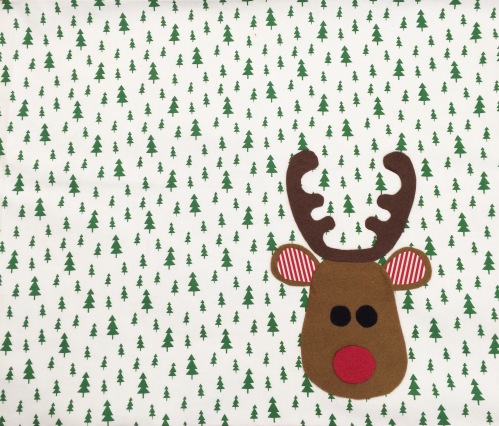
3/ Sew the border to the bottom and the facing to the top edge. Overlock the border seam. Press both seams.11
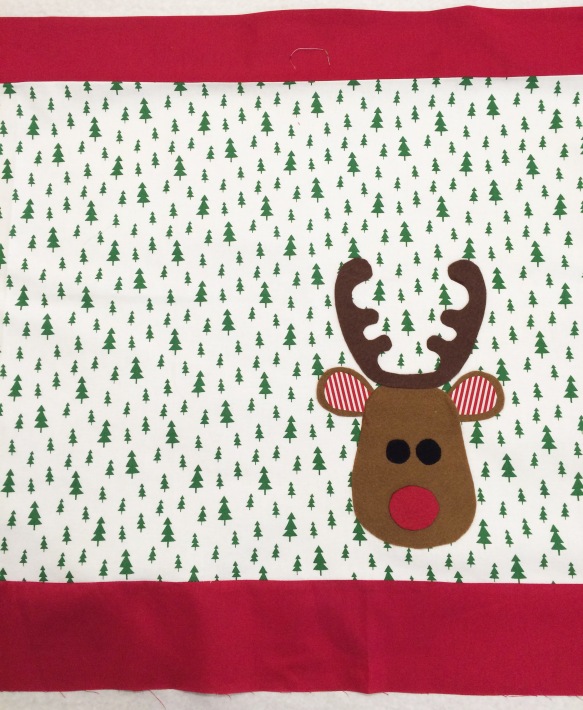
Press the edge of the facing under 1cm / 3/8″. Then turn the facing under and press flat.12
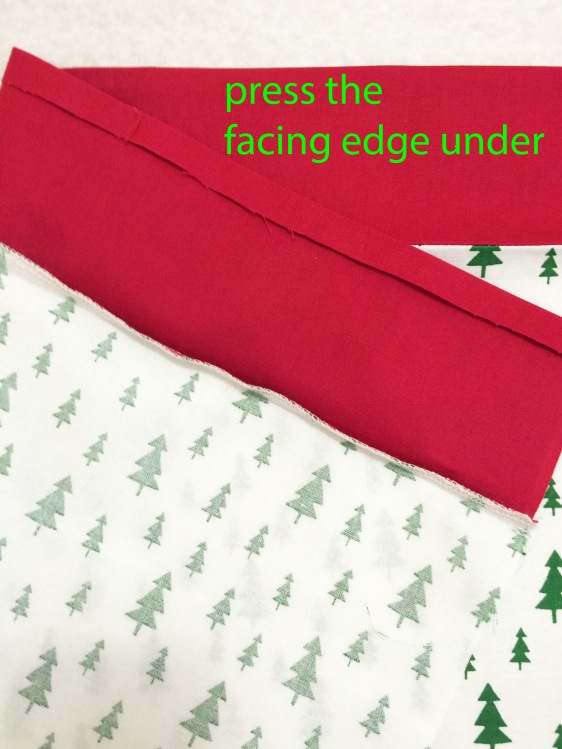
4/ Sew the bag together: fold the whole thing in half or if in two parts place together and stitch to form a bag along the sides and bottom. Overlock or use a zigzag stitch to finish the seams. Turn the bag out and press the seams flat.13
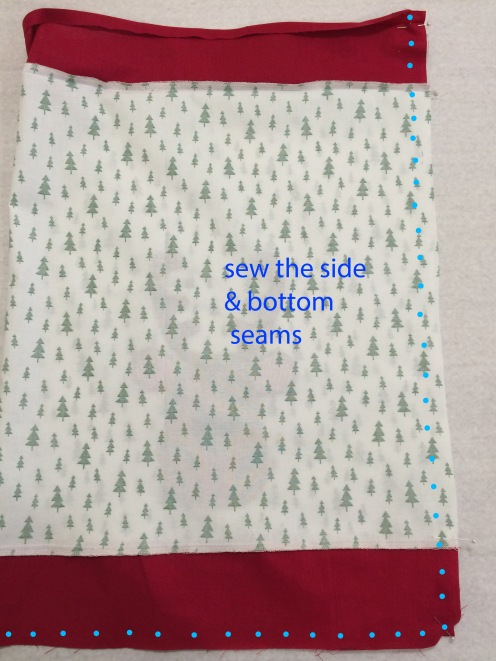
5/ Stitch the facing down: fold the facing to the inside; this should be easy because you have already pressed it under before stitching the bag seams. Press the facing flat, pin to hold and stitch the edge down.14Turn out and give a final press.                                                                                                             6/ Make the fabric tie: I cut my tie 90cm X 8cm [ 36″ X 3″]. It can be any width or length depending on how large a bow when tied up. Make the tie in the same way as for a belt or strap. Fold the tie in half and stitch with a very narrow seam, leaving a small gap at the centre to turn through. Turn out and press. 19
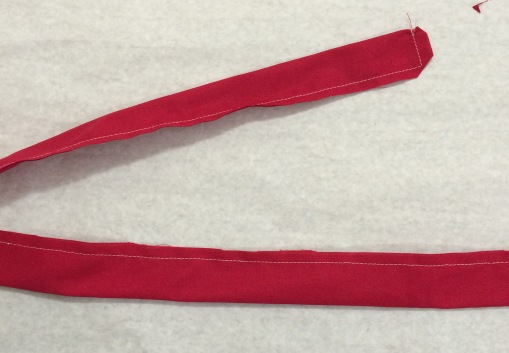
Stitch the centre of the tie to the side seam level with the bottom edge of the facing.bow tie
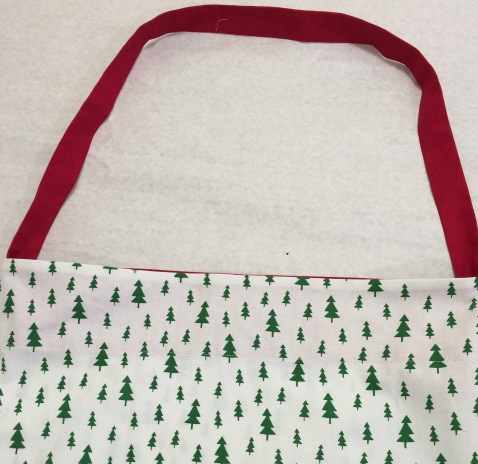
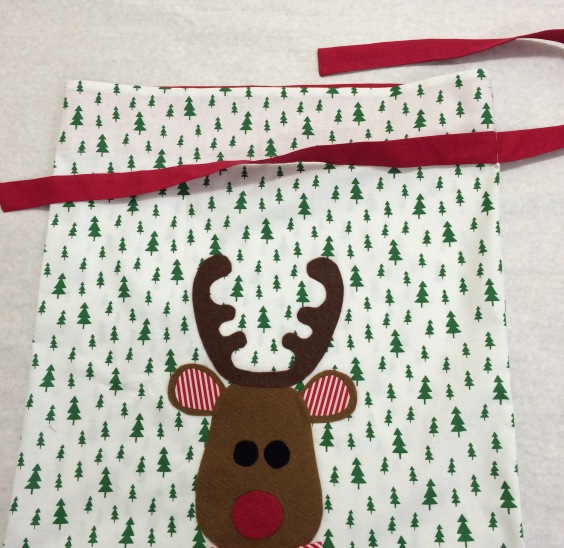
Alternately use a handle or loop to hang the Santa Sacks up.loophandle
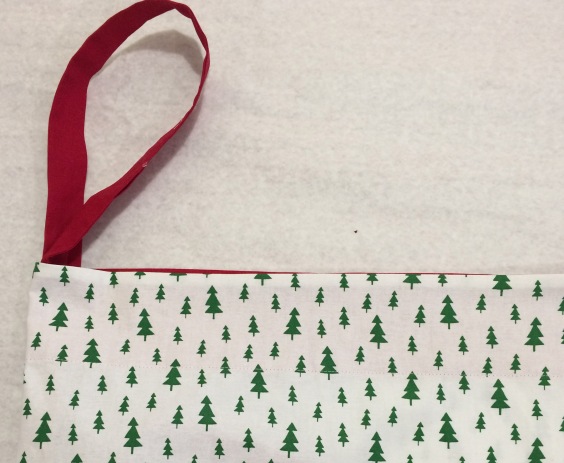
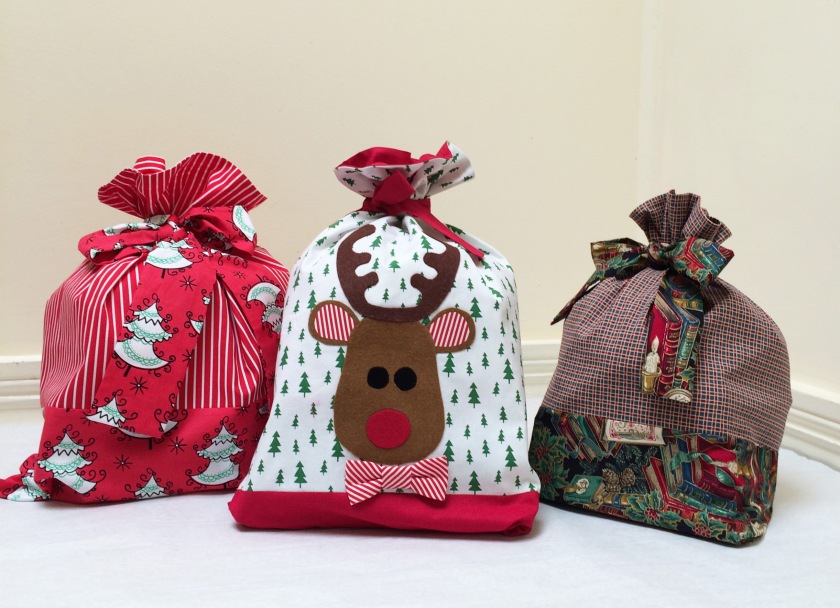
Stitch on Rudolph’s bowtie and it’s finished.finished
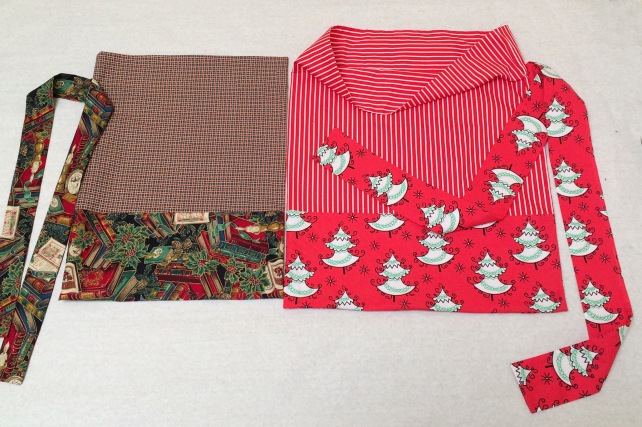
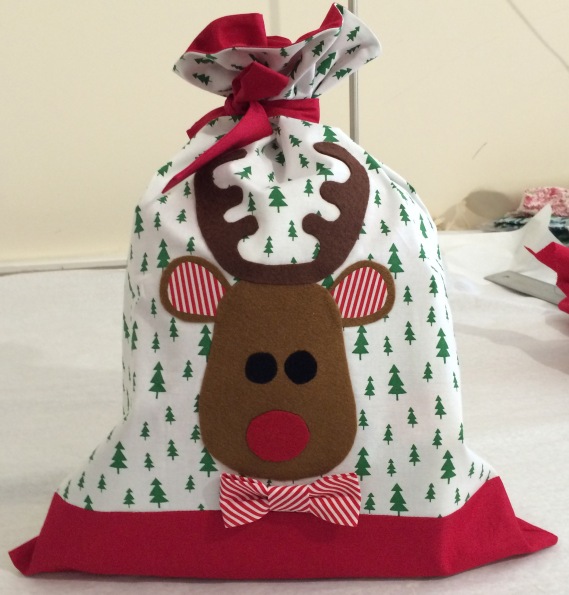
Below are two finished bags made in the same way but in different sizes and with wider borders and larger bow ties. The left hand sack does not have a separate contrast facing but I have cut the main bag section long enough to include a deep 7cm/3″ hem.Santa sacks variationsMERRY CHRISTMAS!scroll


What is Felicity Patterns Blog About?

Pattern hacks! I am a pattern hacker from way back.
Sewing Tutorials for all Felicity Patterns free patterns.
Sewing techniques and tips.

Pattern Hacks or Style Alts.

I am a pattern hacker from way back; when I was a teen I used to make my own clothes and I hacked patterns for all they were worth. I still do it. If you have a pattern you love it’s often easier to make a few changes than to have to experiment with something completely new.

Here on the blog you will find a load of very useful tutorials showing how to create new styles from existing patterns so that you can get much more value out of a pattern e.g. I’ll show you how to alter the Willow Shirt to make a girls shirt dress, Wonderful! now not only is it an all seasons pattern for boys and girls but now a gorgeous stylish and versatile dress.

Sewing Tutorials for Free Patterns

Over the years I have added a selection of delightful free patterns. These are usually added to celebrate a seasonal holiday like Christmas or Easter and as a little thank you gesture to my valued customers. The free patterns are available to download from the shop but the sewing tutorials for all the free patterns are posted here on the blog. You can locate the tutorial post you want from the Recent Posts list in the sidebar.

Free patterns are also my way of giving customers who are new to pdf patterns a chance to try out a digital pattern before purchasing. You can find out all about digital print at home sewing patterns from the About PDF Patterns page on my website.

Sewing Techniques and Tips

I will be adding some useful tutorials to help you get the best out of Felicity Patterns by improving your knowledge of sewing. Things like how to insert a plain zipper, how to insert a fly zipper and how to make bias binding.


Fabricworm

Childrens PDF print at home sewing patterns.

Blog – One Thimble

Childrens PDF print at home sewing patterns.

Hawthorne Threads Blog

Childrens PDF print at home sewing patterns.

Felicity Sewing Patterns Blog

Childrens PDF print at home sewing patterns.