How to turn the Willow Shirt into a shirt dress.

How to make the Willow Shirt into a shirt dress by Felicity Sewing Patterns blog.

The Willow Shirt is an all seasons shirt for girls and boys sizes 4 to 14 years. The pattern can be purchased at the SHOP on Felicity Patterns website.

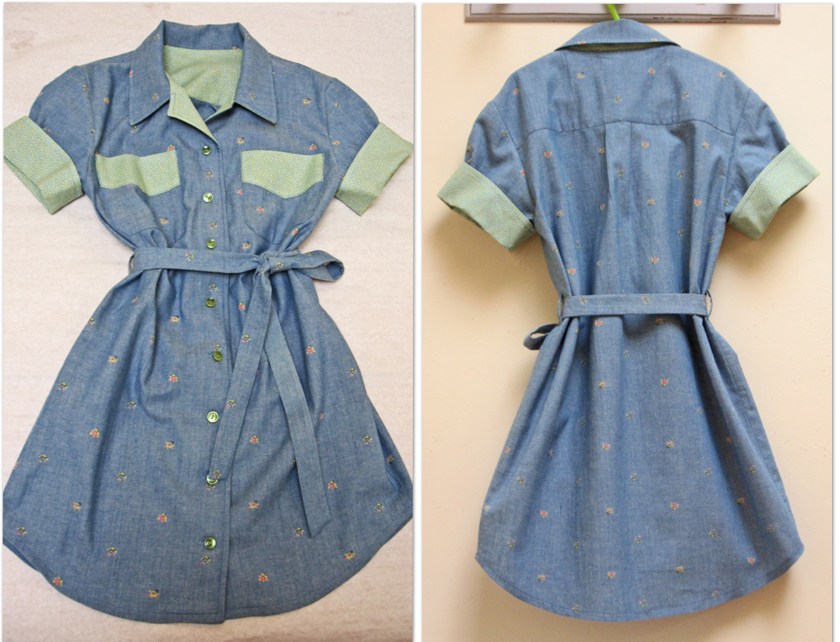
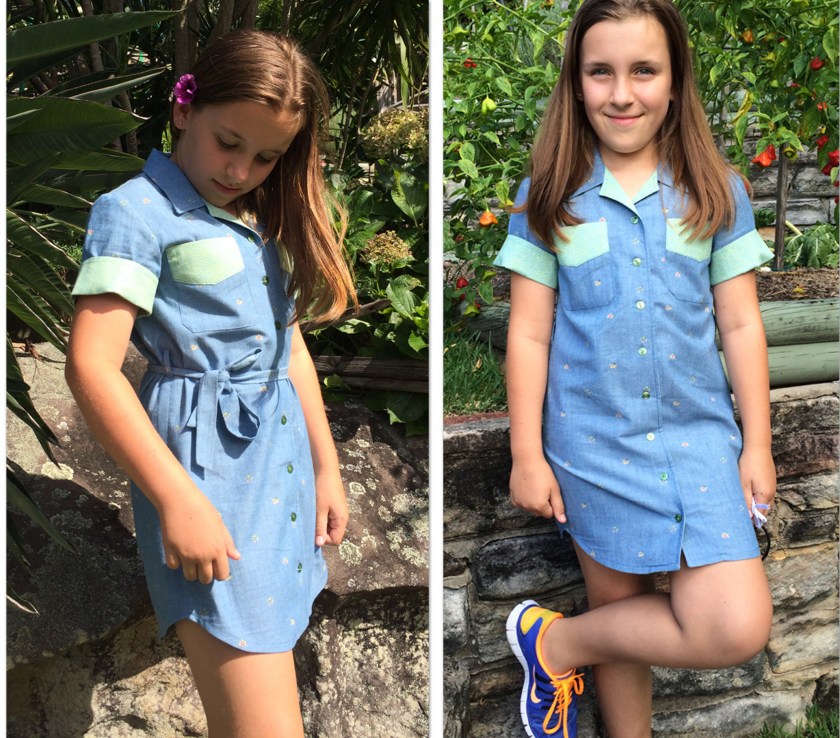
Willow Shirt as a Shirt Dress.

I have always loved shirt dresses; they look so smart but are no-fuss and comfortable to wear. Here’s a quick tutorial to show you how to alter the Willow Shirt pattern to a dress length. You can use a wide variety of fabrics and make it any length you like with long or short sleeves. I recently made a size 12 in chambray for my friend’s granddaughter and added a tie belt. The design details and sewing instructions are the same as for the shirt.

Mia in Willow Dress

To adjust the pattern:

1/ Trace out the complete pattern in the size required. Get a largish sheet of paper to make the new dress length pattern or enough paper to attach an extension to the existing pattern. There are three pattern pieces that will need to be lengthened; the main back, front and facing. All the other parts remain the same.

2/ Get the length measurement for the new dress: the most reliable place to measure length is on the centre back from the cervical bump at the base of the neck down to knee level. Then decide the finished length you would like for the dress; about 6 to 8cm / 2½-3” above the knee is a good length for a young girl. Note the finished length.

3/ Lengthen the back pattern:

1

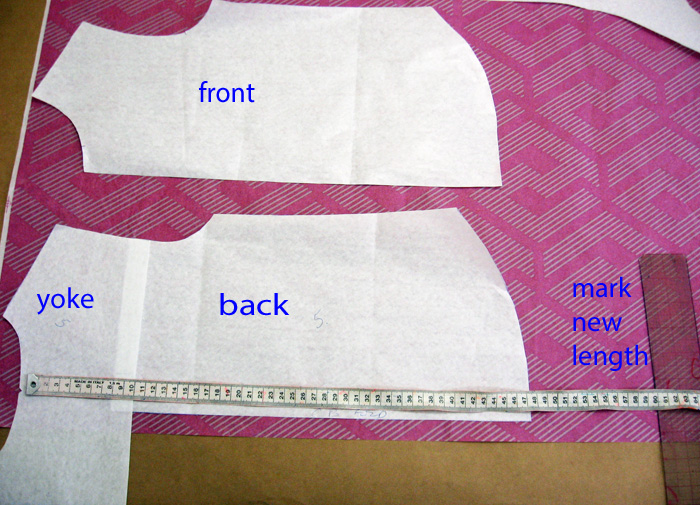
Place the back yoke and body patterns together overlapping the yoke seam allowance. The edge of the yoke neckline sits at the cervical point on the body so measure down from here and mark the new hem length, add a couple of centimeters for the hem allowance.

2

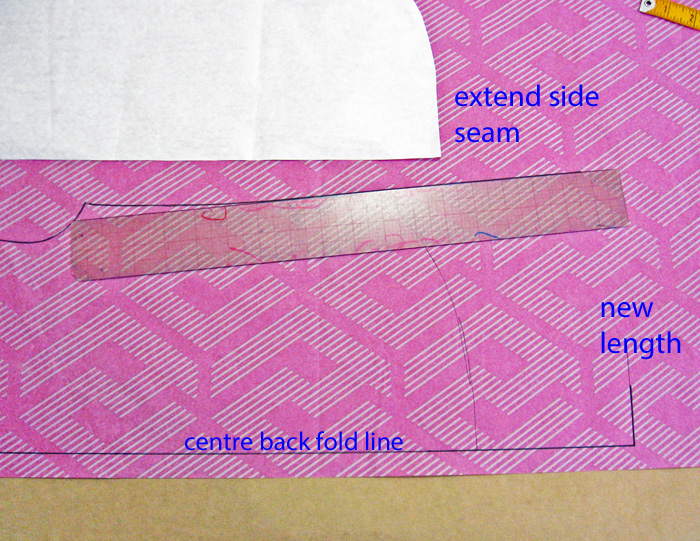
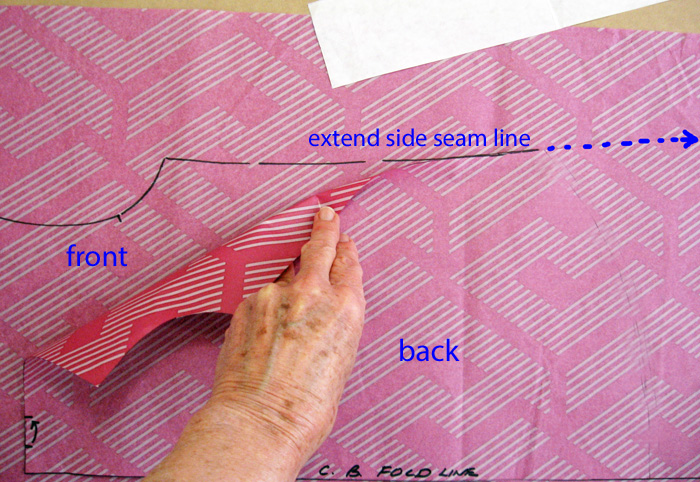
Remove the yoke pattern and outline around the body pattern, use a ruler to extend the side seam and centre back lines to the new length.

3_edited-1

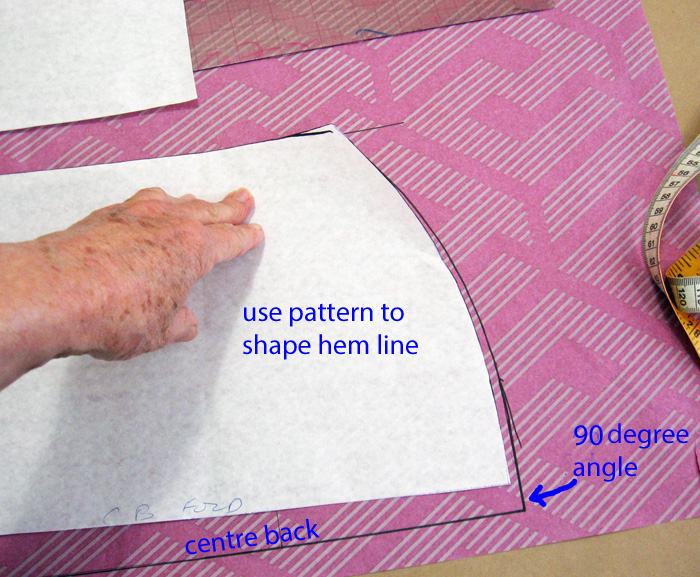
If you want to keep the curved hem use the existing pattern to draw the new hem line. This will be a little wider now. Take care to get a squared 90 degree angle at the centre back/hem junction.Make sure to mark the tuck notches at the yoke seam. Cut the new pattern out. The hem can be squared off if you prefer by lengthening the side seam to create a straighter hemline.

4/ Lengthen the front and facing patterns.

4

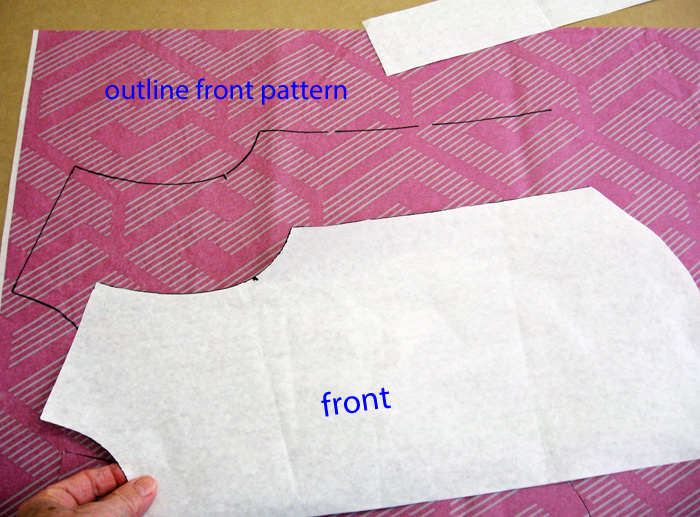
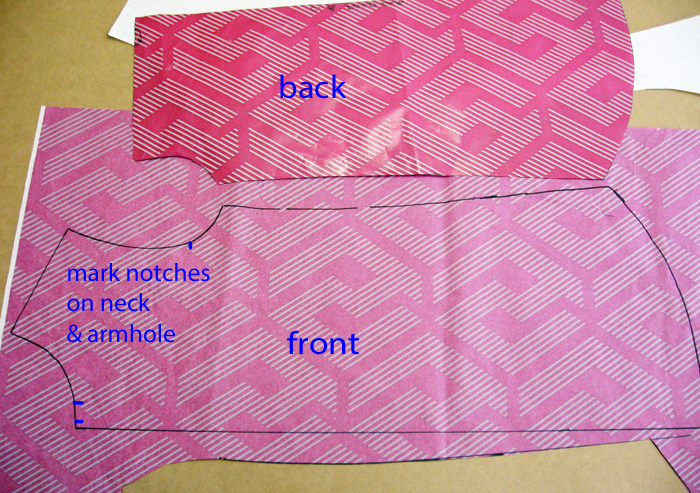
Outline around the front pattern. Mark the notch points on the armhole and neckline.

5

Place the new back pattern against the side seam and draw down so the front is the same length as the back.

6

Rule the centre front line down and use the existing pattern to shape the hem curve. Make sure to get a 90 degree angle at the centre front hem. Cut the pattern out.

7

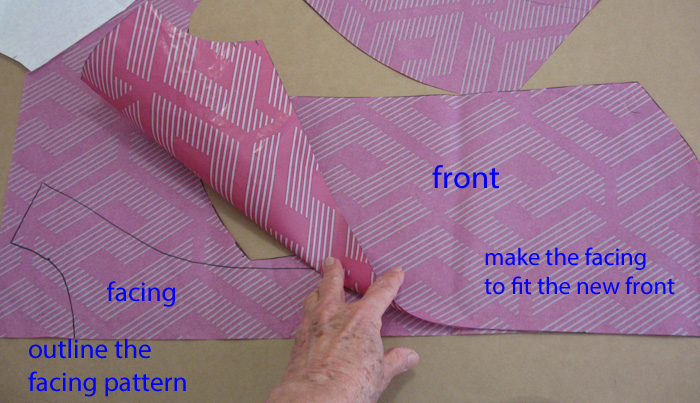
Outline the facing and place the new front against the facing and draw down to get the new length and cut out.

8

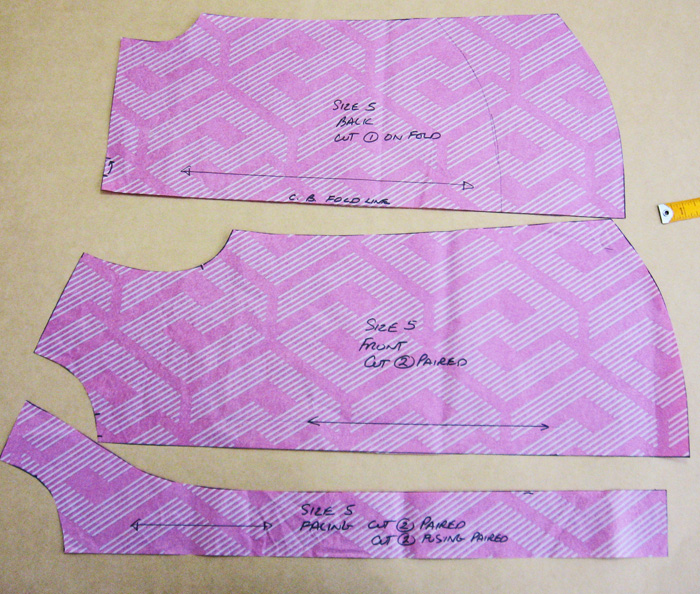
Label the patterns and be sure to mark all the notch points. The dress is ready to cut out now using all the original pattern pieces for collar,sleeves etc.

If you want to add a tie belt simply decide how long and wide you want the finished belt, Use double the finished width for a bagged-out belt, add a small seam allowance and cut out. I also added belt loops to the waist of the dress.

Willow shirt dress

scroll

Tilly Top — how to make the top pattern into a dress with a hem border

How to alter the Tilly Top pattern to make a cute dress with contrast border and trims by felicity Sewing Patterns.

If you already own the Tilly Top pattern you will be able to use this tutorial to get more value out of the pattern. If you would like to purchase the Tilly Top pattern just click to go to the SHOP LISTING.

In this tutorial I will show you how to make the Tilly Top pattern into a dress with a contrast border using the bias binding as a trim and also adding some rickrack braid. The original tutorial shows how to make bias binding or you can use ready made bias.

The only part of the pattern to be altered is the main body piece.

Tilly Dress sewing pattern by Felicity Patterns

Decide the finished length for the new dress pattern.  It helps if you can measure this on the child. The top version sits at about mid hip length so if you mark the waist level at about halfway down the side seam you can calculate how much to add for a finished length about 5cm/2” above the knee. On my size 4 sample I am adding 17cm/6 ¾” to the original pattern length. See the Charts below for approximate finished lengths and amounts to add to the existing pattern. Note: you must add seam allowances to these amounts. I have calculated the fabric lengths based on a cloth width of 112cm/45″.

TRIMS: To complete this project you will also require readymade bias binding with a finished folded width of 1cm/3/8″ or contrast fabric to make your own binding. Ricrack braid; the same length as for the bias. Elastic and matching threads for all parts.

Tilly Dress Charts

Blog post for the Tilly Dress sewing pattern by Felicity Patterns

1/ Trace out the size you want onto a clean piece of paper large enough to make the extensions.

Blog post for the Tilly Dress sewing pattern by Felicity Patterns

2/ Measure down and mark the new length then rule the side seam and centre lines down to this level.

Blog post for the Tilly Dress sewing pattern by Felicity Patterns

3/ Use the original pattern hem edge to draw in the new hemline so you get the gentle curve. Take care to keep a 90 degree angle at the junction of the centre line and hemline. Now you have a dress length pattern; remember to add a small hem allowance if you are not using bias to bind the hem edge.

4

4/ To create a contrast border: decide how wide to make the border; this will depend on the size of the dress so just set a width that is a good balance to the overall length. I am using an 8cm/3” wide border which I have marked in red pen; the border line shape must be the same as the hemline. I am using a bias binding on the hem so I don’t need to add a hem allowance.

5

Cut out the new pattern and make a separate pattern for the border by tracing this out.

6

Add a 1cm/3/8” seam allowance to the top edge and cut out the new border pattern. I have cut my border as a full piece and labeled it ‘Cut 2 Contrast’.

7

Next add a 1cm/3/8” seam allowance under the red line on the main pattern and cut off below this. Now you have a new dress length pattern with a contrast border. The sleeve pieces remain unchanged. If you are using the bias pattern to make binding for the skirt hem just add a few extra centimeters for the wider dress hem.

How to make a ruffled hem panel.

To make a ruffled hem panel follow the steps above to create a border then measure the length of the border seam line. My size 4 is about 26cm and I need 1 ½ times the total width for a gathered panel so the total length of a ruffle for the whole front/back will be 78cm.

8

Draw a long rectangle 78cm X 10cm [8cm + 2cm hem & seam allowance]. Label this ‘Cut 2’ – one for front and one for back.

9

Photo below shows the new pattern with plain border cut out and ready to sew.

layout

Follow the sewing instructions in the original pattern tutorial. The dress construction is the same as for the top with the addition of the skirt border. I have also added the rickrack trim to the sleeves and to the border seam.

Additional Sewing Notes

Prepare your thread colours and bobbins. I am using 3 different colours because of the contrast bias and rickrack.

 Complete STEP 1 in the original tutorial to make the binding.

Using main thread colour: attach the border pieces to the front and back dress pieces, overlock and press the seams. Sew one side seam, overlock and press.

Change thread colour and attach the bias to the hem of the skirt border by following the instructions in STEP 3 of the original tutorial

11

 GO TO STEP 2: sew the bias binding to the sleeve edges.

Change thread colour and stitch the rickrack braid on about 2cm/3/4” in from the bias. A zigzag stitch is best for sewing on rickrack.

Next sew the rickrack along the border seam line on the skirt.

Close-up view of bias binding and rickrack braid.

Blog post for the Tilly Dress sewing pattern by Felicity Patterns

Change to main thread colour. Sew the remaining side seam closed, overlock and press.

Continue with the original tutorial to complete the dress.

Blog post for the Tilly Dress sewing pattern by Felicity Patterns

Finished Dress

scroll

Fabricworm

Childrens PDF print at home sewing patterns.

Blog – One Thimble

Childrens PDF print at home sewing patterns.

Hawthorne Threads Blog

Childrens PDF print at home sewing patterns.

Felicity Sewing Patterns Blog

Childrens PDF print at home sewing patterns.