Get your FREE PATTERN and see how to make these cute and easy kids pants plus XmasTree applique.
Get your FREE PATTERN and see how to make these cute and easy kids pants. Go to the Shop and look in the ‘Free Patterns’ shop section — Play Pants Free Pattern or click here Free Pattern — just add the pattern to the cart and ‘buy’ it for free. Then view the sewing tutorial here to see how to sew the pants.
When you get your free pattern please leave a Comment in the box at the end of the sewing tutorial. The Play Pants pattern is a basic pant pattern with a patch pocket in sizes to fit kids from 1 to 10 years old. The pattern includes a simple easy to make Christmas tree appliqué to use on a T shirt or skirt. The pattern is suitable for boys and girls and is ideal for pyjama pants. The basic pattern can be altered to have a cuff or ruffle on the hem. The length can also be adjusted to shorts or 3/4 length pants. This is a very easy pattern, great for beginners.
The T shirt pattern is not included as a free pattern but can be purchased from Felicity Sewing Patterns website shop at the discounted price of US $4.00.
To see the full range of delightful kids pdf digital sewing patterns please visit the online shop — https://felicitysewingpatterns.com/ Find us on Etsy —- https://www.etsy.com/shop/FelicityPatterns?ref=hdr_shop_menu
GETTING STARTED — WHAT YOU NEED
FABRIC: This depends on the finished use of the pants; pyjamas require soft, lightweight cottons or minimal stretch knits e.g. lawn, poplin, flannel or interlock. For day wear any light to medium weight wovens or knits e.g. homespun, drill, pin-wale corduroy and fleecy. Check the fabric chart for the amount of fabric and elastic required. The fabric lengths are based on 112cm/45″ standard fabric width. Lengths are given for the main with contrast option as shown in the tutorial and also for the basic unaltered pant in one fabric only. The elastic is 22 – 25mm or 3/4″ – 1″ wide x the length given on the chart. Matching sewing thread. You can add extra trims e.g. lace, braid or piping.
SIZING: Patterns sizes = 1, 2, 3, 4, 6, 8, 10 to fit kids 1 to 10 years approx. Check the size chart to select the best size for your child based on their height and waist measurements. The leg length can be easily adjusted if necessary.
PREPARE THE PATTERN
1/ Print out the pattern pages and glue them together – see the Printing Instructions and Guide to Assembling the Pattern Pages included with the pattern file. Trace out a paper pattern for the size you want following the colour code. You can do this by tracing with a tracing wheel onto plain paper or using see-through baking paper and trace with a pencil. I think it’s easier to use a tracing wheel so invest in one of these. Tracing the pattern out means you can keep the master pattern intact for future use. Please note that all cutting out instructions, seam and hem allowances and grain lines are marked on the pattern.
 It’s very important to get the grain straight when cutting long pants; the best way to get the perfect straight grain is to fold the pattern in half placing the hem edge perfectly square and equal and then press a cease in along the full length of the leg to get the grain line then mark with a pen and ruler.
 Rule a line for the hem turnings and the waist turning these are both 4cm/11/2” wide. Don’t forget the pocket pattern.
 Now the basic pattern is ready to use.
PATTERN ADJUSTMENT FOR SEPARATE CUFF
I decided to add a contrast cuff to my basic pants so here’s how to alter the pattern: decide on the width you want; for my size two I used 8cm /3 1/4 inch, this would be a good width for all sizes. Measure up from the hem turning or finished length of the pant and rule a line then add a 1cm/3/8” hem allowance, fold the unwanted part of the pattern under and pin to hold. Do this on back and front. Place the side seams together, overlapping 2cm/¾” and measure the total circumference/length of the hem, 38cm for size 2. Make a pattern for the cuff 38cm x 9cm [the finished cuff width + seam], fold double and cut out. The total pattern dimensions for a size 2 would be 38cm x 18cm. Label “Cut 2”.
 NOTE: If you would like a ruffled hem follow the instructions as for the cuff but use a single width not double [e.g 38cm x 10cm] and add extra length for gathering — about half to two thirds — so total pattern dimension of approx 57cm x 10cm for a size 2. Label “Cut 2”. OK! this is what you should end up with ———
CUTTING OUT
I am using the contrast print for the cuffs and pockets. The size 2 just fits nicely into the folded fabric width. If you are using a one-way-up print the patterns must be cut the same way up. The fronts and backs have to be cut paired or mirrored. Refer to the original pattern printout for cutting instructions, grain lines and seam allowance details marked on the pattern.

SEWING THE PANTS
Make the pockets: overlock around the edges. Fold the pocket hem to the outside and sew down at the sides. Turn to the inside, press the seam allowance under all around and sew the pocket hem down. All seam allowances are 1cm/3/8″. Make the Pants: sew the side seams together, overlock and press. Press the waist casing under so you can see how wide the waist band will be.
 Place the pockets on the front at least 6 cm below the finished top edge at the side seam position and about 1cm in from the side seam, pin and sew in place. The pocket position will vary with the size so just make sure it looks balanced.
 Sew the centre front and centre back seams, overlock and press. Sew the inside leg seams together matching at the crotch seam, overlock and press.
 Pockets stitched on and seams all sewn together.
 Attach the cuffs: press each cuff in half lengthways, then check that the cuff and leg measure exactly the same and make any necessary adjustments. Sew the cuff seam and press open.
 Fold the cuff in half again and pin to the right side of the leg with the cuff seam at the inside leg seam. Sew in place, overlock and press. On the outside sew a row of topstitching along the seam to hold the seam flat on the underside.
 Make the waist casing: The total width of the casing allowance is 4cm/11/2”. For a neat finish press the edge of the casing under 1cm/3/8” and turn casing under along the finished edge line [you pressed this under earlier]. Sew the casing down and sew a row of stitching along the top edge to give a neater finish after the elastic is inserted.
Use a seam ripper to open the centre back seam into the casing and insert the elastic here. Securely stitch the elastic ends and distribute the fullness evenly around the waist. To stop the elastic rolling stitch across the casing through the elastic at the centre front seam. FINISHED!
Christmas Tree Applique Sewing Tutorial
Here is a simple easy appliqué that can be used on a T shirt front or on a skirt. I am making a T shirt top to go with my Play Pants so I will apply the appliqué directly to the front of the shirt before I stitch it together. However if you want to add the appliqué to an existing shirt you can construct it onto a square of fabric making it easier to simply sew the square to the front of the shirt. The appliqué comes in two sizes and the template is included in the Play Pants pattern file.

MATERIALS REQUIRED
Fabric scraps, iron-on appliqué backing, sewing thread plus you can add extra trimmings e.g. beads, buttons or glitter. Pinking shears if you already have them are best for cutting out the shapes but not essential. I am going to machine stitch my appliqué but if you are an experienced crafter you might prefer to hand sew everything.
Print out the templates and carefully cut them out, use them to cut out pieces of fabric slightly larger than the shape of the template. Next cut a piece of iron-on backing for each shape and iron this onto the back of the fabric shapes; make sure to use a light pressing cloth or some tissue paper to protect the iron and ironing board. Now each shape will have a paper surface on the back. Use the templates and draw the shapes onto the paper backing, cut them out carefully with sharp scissors or pinking shears. If you are hand sewing it’s best to cut with plain scissors.
 Carefully peel the paper backing off and layout the design overlapping each piece a small amount [about 6mm/¼”]; line everything up as though you are following a centre line so you have tree trunk, bottom layer, middle layer, top layer and star. It’s best to do this on the ironing board so there’s no need to move once it’s set in place. When you are happy with the way it looks press it on firmly.
 Now sew around all the edges; use a plain stitch if the edges are pinked or a zigzag if they are plain. To keep it neat stitch each section separately changing thread colour if necessary. Pull the thread ends through to the underside and tie off.
 Makes a cute set of Christmas night pyjamas.


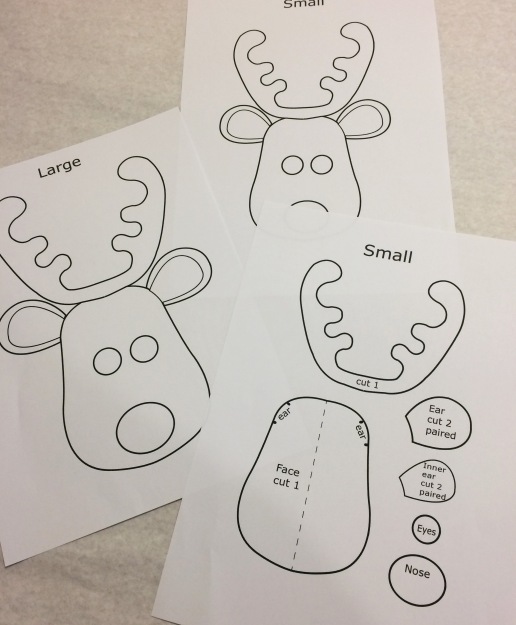
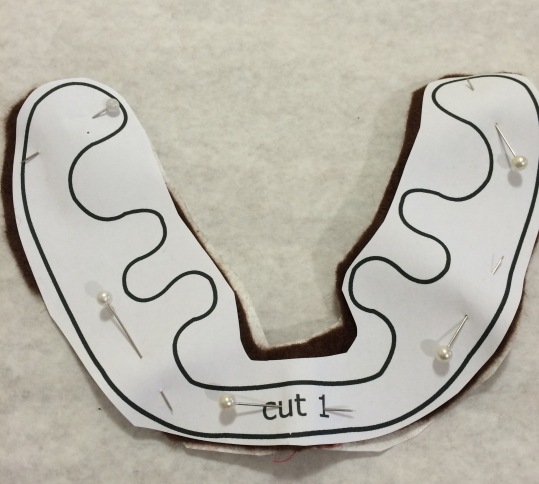 3/ Pin the template in place and using sharp scissors trim the shapes exactly to the template outline. Do this for all the applique parts.
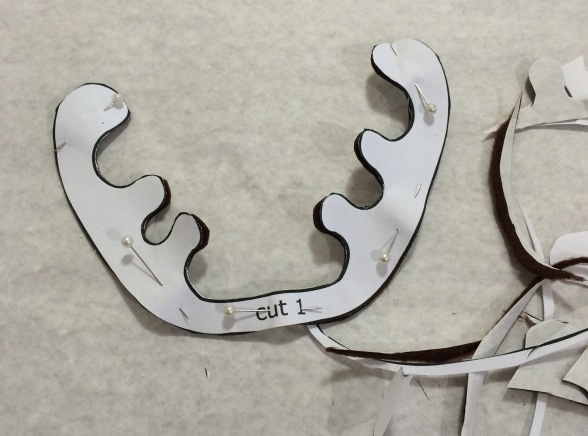 4/ Work out the position for the applique. For my santa sack I placed it in the centre and 3-4cm / 1-1/4″ — 1-1/2″ up from the bottom edge. Use the printed illustration as a guide to layout all the parts correctly.
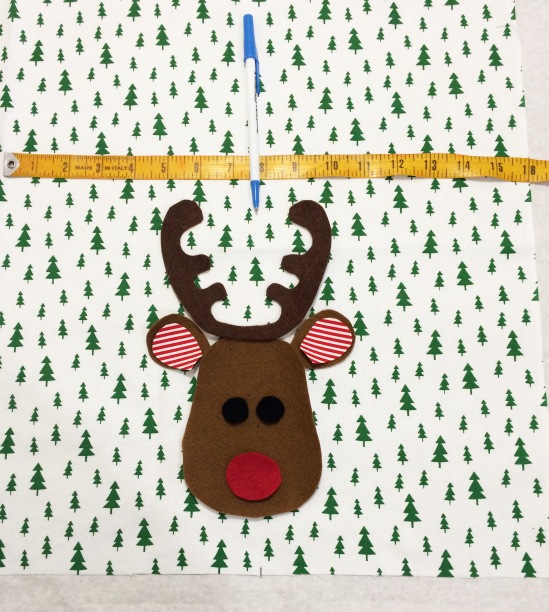
 5/ Fuse the applique parts to the fabric. Peel the paper backing off all the parts. The sequence for fusing on the parts is: ears, face, antlers, nose and eyes. The face should just slightly overlap the ends of the ears and the antlers should overlap the top of the head. Fuse the two ear parts in place first then continue the sequence using a hot iron and pressing cloth. You will need to apply some pressure with the iron.
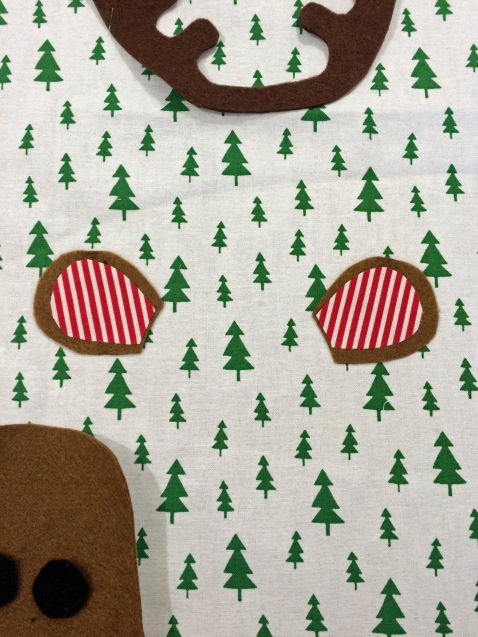
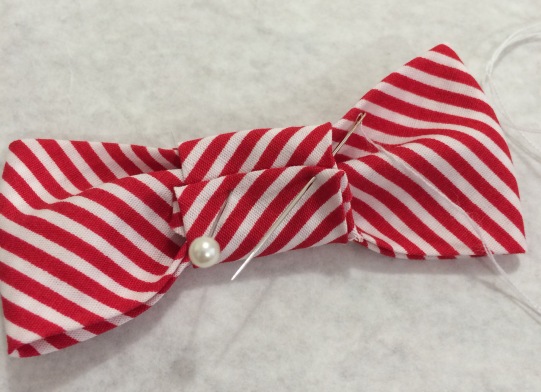
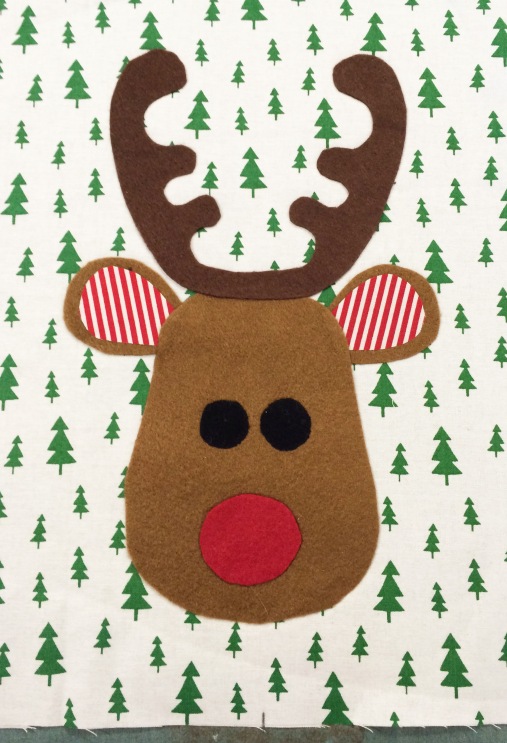 If you are going to stitch the applique do this now. It is now ready to complete sewing the santa sack. 6/ Make the bowtie. Cut a strip of fabric 8cm X 20cm / 3-1/2″ X 8″ [ I cut the stripes on bias]. Press the edges to the centre and fold over to form a bow shape. Use a small rectangle of fabric for the keeper and wrap this around the bow and stitch by hand. It’s best to attach the bowtie after the bag is sewn together.
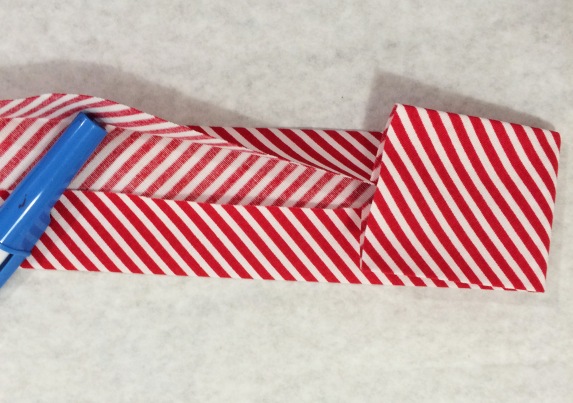
 2/ Applique: if using the applique position so that it will be in the centre of one side of the bag and closer to the bottom than top.
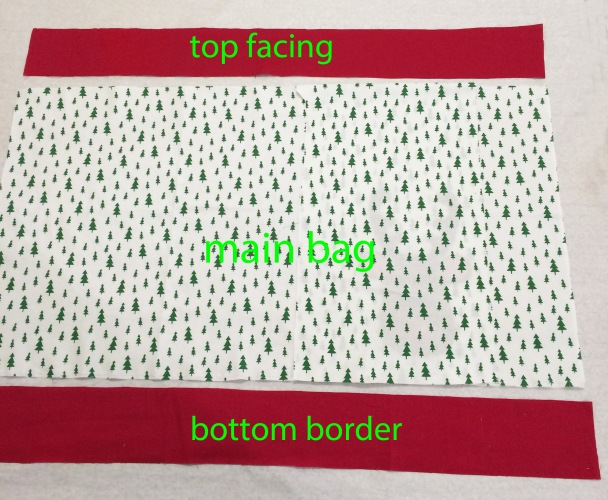
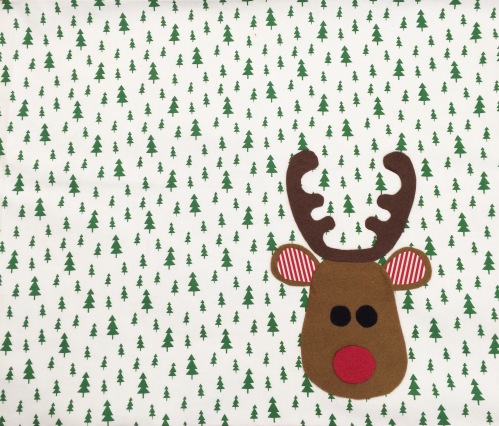 3/ Sew the border to the bottom and the facing to the top edge. Overlock the border seam. Press both seams.
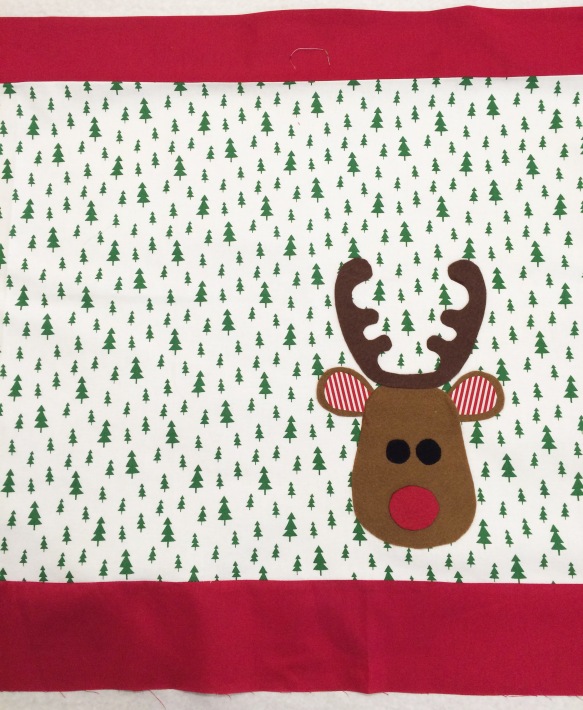 Press the edge of the facing under 1cm / 3/8″. Then turn the facing under and press flat.
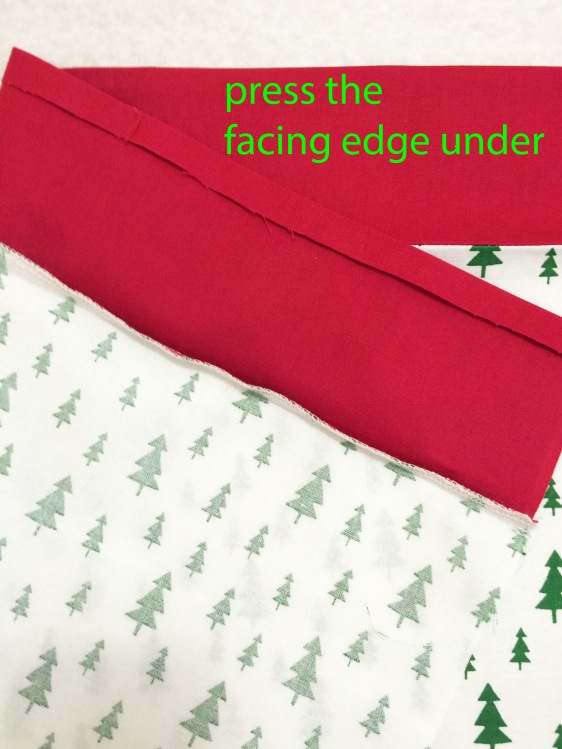 4/ Sew the bag together: fold the whole thing in half or if in two parts place together and stitch to form a bag along the sides and bottom. Overlock or use a zigzag stitch to finish the seams. Turn the bag out and press the seams flat.
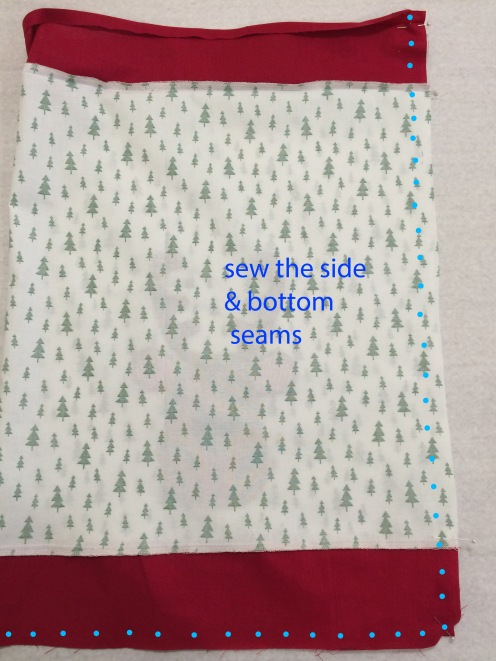 5/ Stitch the facing down: fold the facing to the inside; this should be easy because you have already pressed it under before stitching the bag seams. Press the facing flat, pin to hold and stitch the edge down.
 Turn out and give a final press. 6/ Make the fabric tie: I cut my tie 90cm X 8cm [ 36″ X 3″]. It can be any width or length depending on how large a bow when tied up. Make the tie in the same way as for a belt or strap. Fold the tie in half and stitch with a very narrow seam, leaving a small gap at the centre to turn through. Turn out and press.
 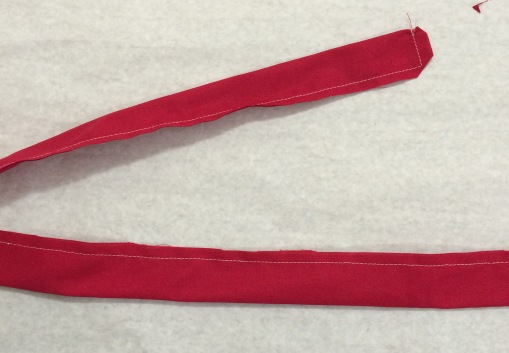 Stitch the centre of the tie to the side seam level with the bottom edge of the facing.
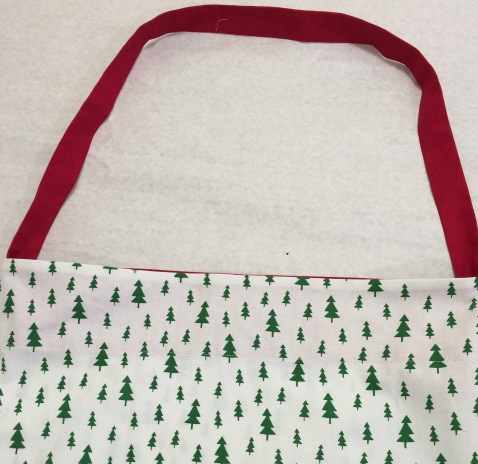
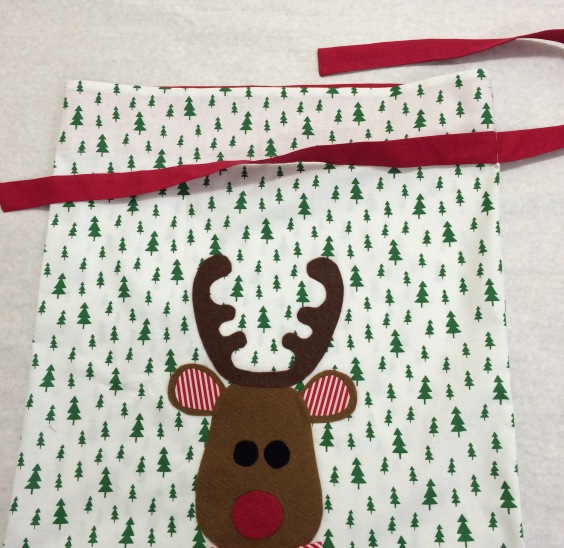 Alternately use a handle or loop to hang the Santa Sacks up.
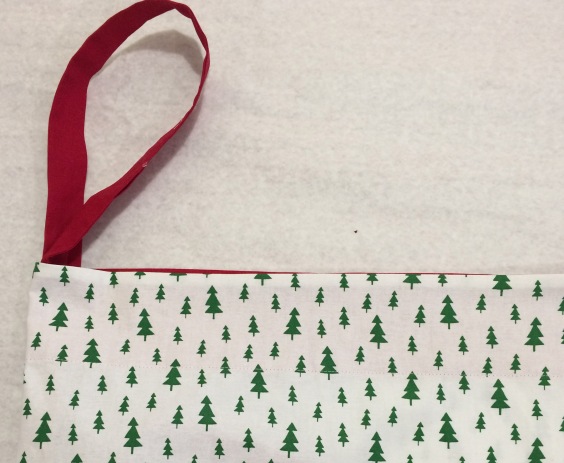
 Stitch on Rudolph’s bowtie and it’s finished.
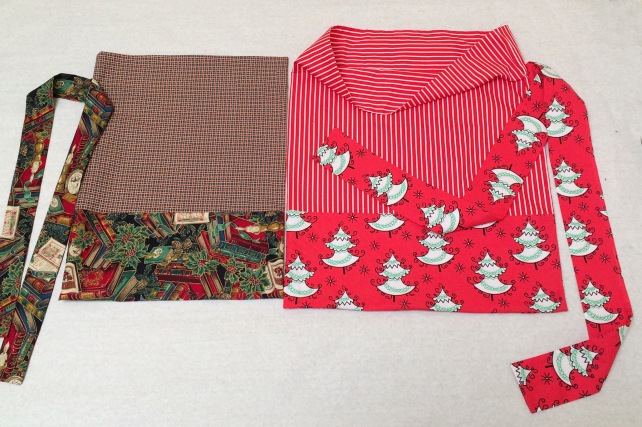
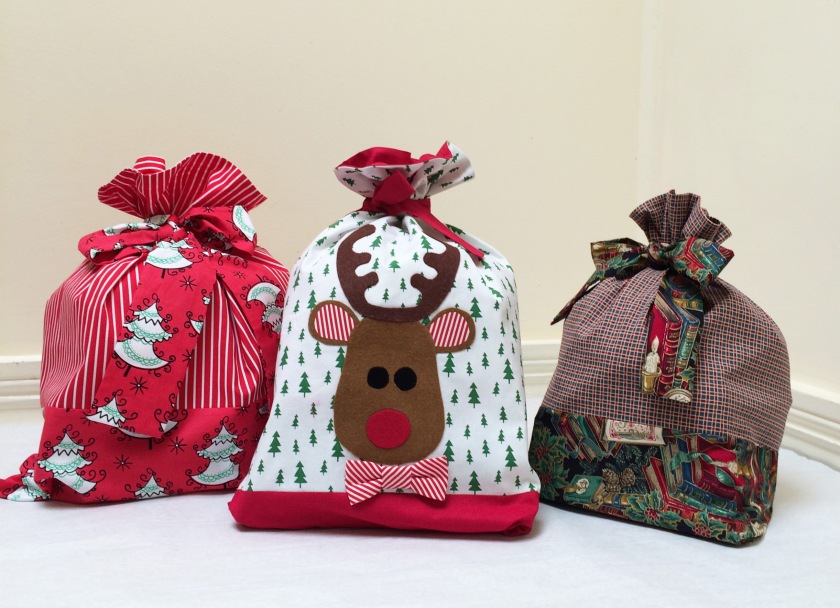
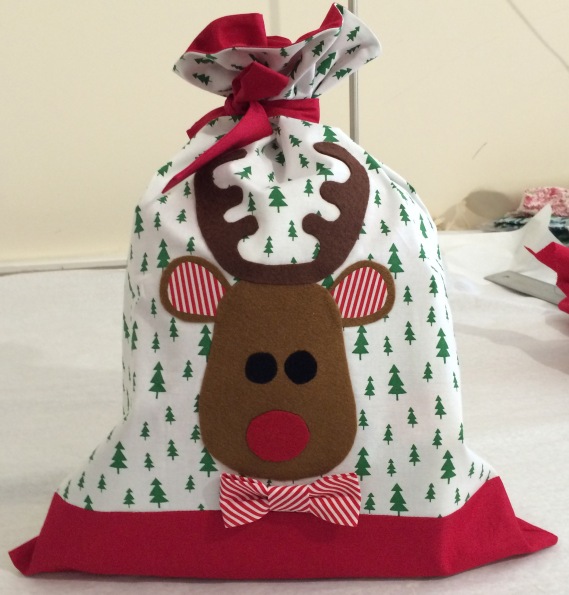 Below are two finished bags made in the same way but in different sizes and with wider borders and larger bow ties. The left hand sack does not have a separate contrast facing but I have cut the main bag section long enough to include a deep 7cm/3″ hem.