Welcome to the Cross-back Apron free pattern download. To get your free pattern download go to the SHOP, select Free Patterns from the Menu and put the pattern in your cart and “buy” it for free.
In the pattern file you will find two separate patterns for the adult and kids aprons; please print each pattern separately to save confusion. This file contains only the patterns and instruction sheets for printing and assembling the patterns the sewing tutorial is posted here on Felicity Sewing Patterns BLOG.

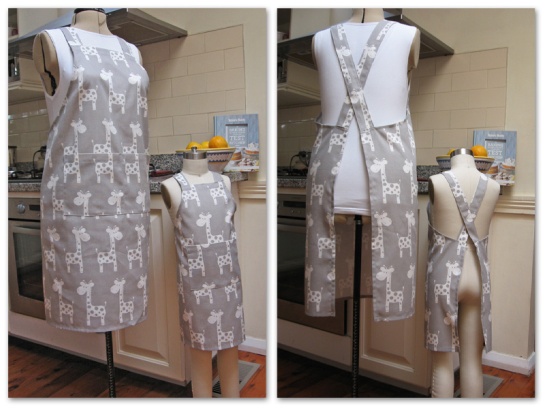
Description: This is by far my favourite apron style; it covers everything and is easy to slip in and out of with no ties just simple cross-over straps. It has a large pocket at the front which also gives extra reinforcement just where the apron gets the most wear. For the apprentice chef in your life there is the kid’s version which is identical to the adult shape but comes in sizes to fit kids aged from about 4 to 10 years old. The fit is very flexible and getting it just right depends on adjusting the finished strap length to your perfect fit. The Apron is very quick and easy to sew, a perfect project for beginners.
Sizes: Both patterns come in sizes small, medium and large. Check the size chart for a guide to the best size to use. Please note the adult pattern must have extra length added to the bottom edge.
Fabric: I prefer to use a heavier weight cotton or poly/cotton for a kitchen apron so a cotton drill or ducking is suitable; denim is also a great choice. I have used a cotton furnishing fabric which has the added benefit of being a wider width at 124cm/49”. See the fabric chart for amount required. The only other thing you need is matching thread.

Follow the instructions in the pattern file to print and assemble the patterns and check the size chart for the best size to use. The size chart gives a guide to the approximate body size for the small, medium and large sizes for both kids and adults.
Cutting Guide:
The adult pattern must have extra length added to the bottom edge: I added an extra 16cm/6 ½” inches to my medium size apron so that it reaches just past knee level.
The pattern is easy to adjust if required; length can be added or reduced at the hem and the sides can be extended for more wrap at the back. Extra length is included on the strap pattern so that you can adjust the straps to suit your own height. It is best to trace the pocket patterns out as full pieces. Follow the cutting instructions on the pattern. When laying up the patterns to cut out check that the fabric print is not a one-way print if this is the case you must place all the patterns in the same direction. Make sure to clip the notch marks for the hem turnings. If you are tall it might be wise to add extra length to the straps as this can be adjusted later.
I had to join two photos to get the whole layout in.
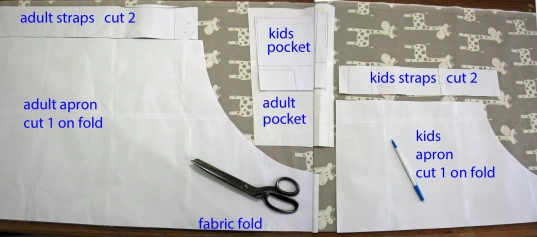
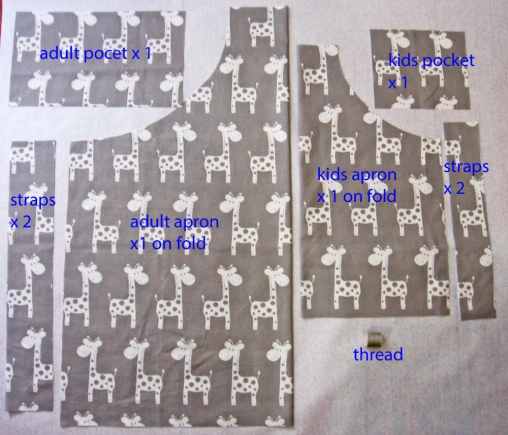
Everything cut out and ready to sew for adult & child aprons in size medium.
Sew the Apron
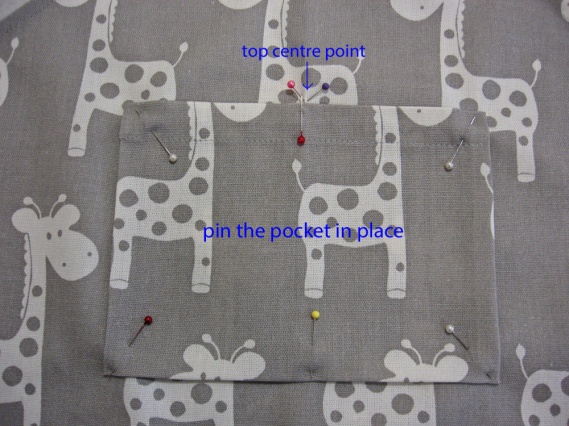
Before you start mark the centre top position for the pocket. On the centre front fold edge of the apron pattern you will see a notch mark for this so put a chalk mark or pins to mark this point on your apron front.

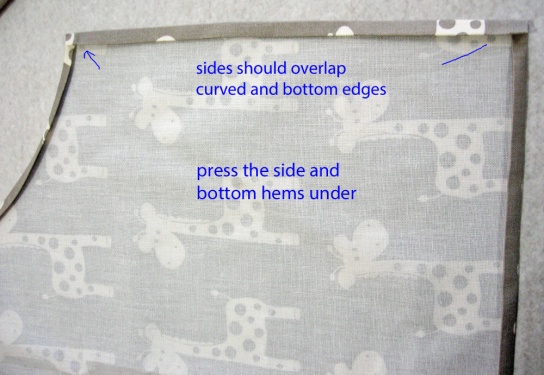
1/ All the edges except the bib have a 2cm/3/4” hem allowance. Press the hem allowances under with a double turn using a fairly hot iron depending on the fabric you are working with.
Start with the curved side edges and press under 1cm then turn again 1cm and press. The bias grain on the edge will allow the hem to turn without buckling but take care not to over stretch. Sew down. Next press the bib hem edge under 1cm and again 2.5cm and stitch down.

Go to the bottom hem edge and press this under 1cm and 1cm then do the same on the side edges. You should have a double turned hem all around with a finished width of 1cm/3/8”. Sew down all around.
2/ Make the pocket.
Press a 1cm/3/8”single turning on the sides and bottom edges, then press the top edge under 1cm/3/8” and again 2cm. Stitch the top hem down. You can overlock the edges but I didn’t bother.
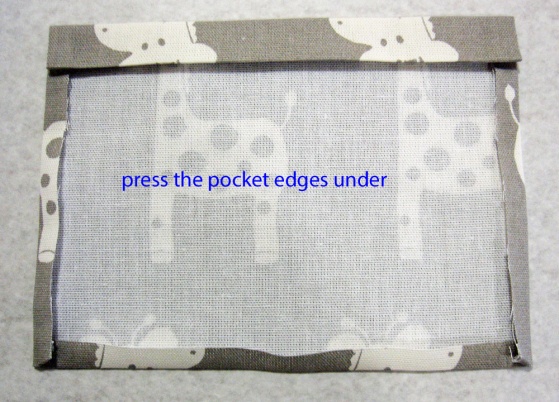
Position the pocket on the front of the apron using the centre point you marked earlier. Place the centre of the pocket’s top edge at the mark and ensure that the pocket is perfectly squared up to the hem and side edges of the apron. Pin to hold in place and stitch on close to the edges making a couple of double reverses at the two top corners for extra strength. The pocket can be divided into two by sewing through the centre from top to bottom. The kid’s pocket is best left as one large pocket.
3/ Make the straps.
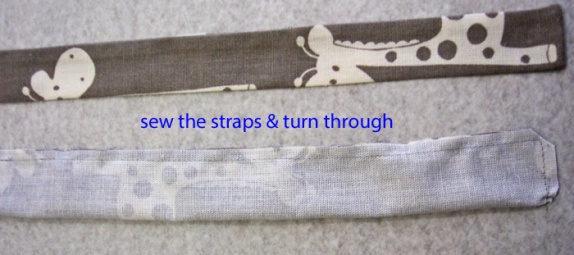
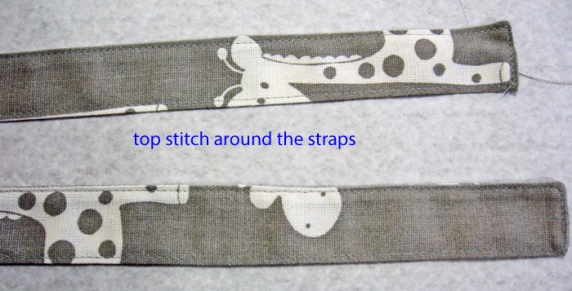
Fold the straps in half with wrong side out and sew along the length, leave a 3cm gap midway to turn out; sew across both ends. The seam allowance is 6mm/1/4”. Turn the straps through and press to smooth out the seams. Hand stitch the gap closed or sew a top stitch around the entire strap close enough to the edge to seal the gap.
Attach the strap ends to each side of the front bib stitching securely to hold. There is a 2cm/3/4″ allowance for this.
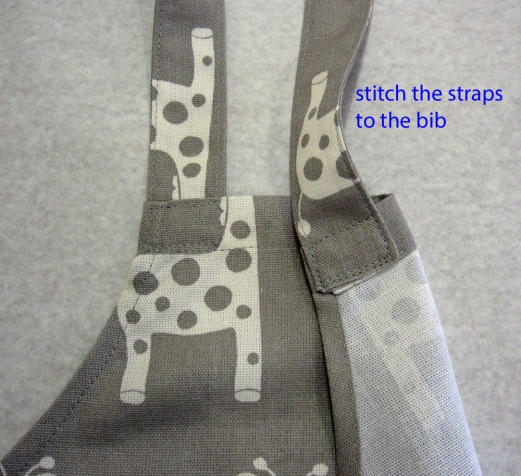
Cross the straps over and pin the ends to the back corners of the apron. The straps should be longer than required so start by pinning them so that there is about 4cm/1 ½” excess.

Now it is best to try the apron on to be sure to get the correct strap length for your height. To get the correct fit the bib should be fairly high on the chest and the apron should fall and wrap smoothly around the hips without any dragging or excessive gape at the curved side edges although there will be some gape here as there are no darts to shape the edge to the body. Take a close look at the finished photos to see how it should look. If the back of the apron is swinging forward the straps are too long and if the back is pulling up or the sides are gaping a lot then the straps are too short. Don’t make the straps too short or it will be difficult to get the apron on and off.
Correct strap length. = minimal gapping and no swinging or dragging.

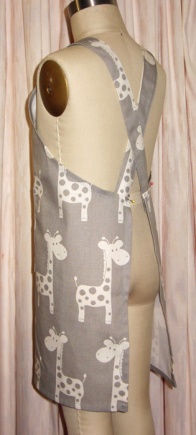
If you are making for gifts or to sell then attach the strap with a 2cm allowance at the front and with an excess of 4cm/1 ½” at the back.
It is also possible to make adjustable straps by using a slide buckle attached at the front bib. Add extra length to the straps for this.
I hope you all enjoy your aprons! I love mine and plan to make more for friends and family.


I just downloaded the apron pattern, thank you very much!
LikeLike
You are very welcome.
LikeLike
Thank you, no more neck pain!
LikeLike
Thanks for the free pattern, it will be perfect for a smart denim version for my dad for Christmas. Much appreciated.
LikeLike
Lindo eu gostei muito
Vou fazer um para mim
Muito obrigada
LikeLike
Thanks for lovely practical apron pattern.
LikeLike
Just assembled the pattern and about to make my first apron- looks pretty straightforward. Thank you for pattern and instructions.
LikeLike
Thank you for this pattern. My Grand daughter just showed me a apron top she wanted that is just like this from Bangerwood. Extending the back sides a bit to cover more of the butt area and I am good to go to make it for her. You made my Christmas giving easier this year! Awesome, love your site!
LikeLike
I hope you have a wonderful Christmas, Thank you for your comment.
LikeLike
Thank you for the apron pattern! I’m going to make it for my cousin for Christmas in a print that will match her newly renovated kitchen. Hugs, Jen
LikeLike
This is perfect. I love your other patterns on your website, too. Thank you for sharing your time and talents.
LikeLike
Thank you for sharing!! Just what my granddaughter wanted for her cooking classes!!
LikeLike
Is it still possible to get this apron pattern?
LikeLike
Yes you will find it on my website shop under Free Patterns.
LikeLike
Thankyou for the free apron pattern, my 11 year old loved making it! Great pattern for her to begin sewing!
LikeLike
Thanks so much for this pattern!! I’ve got a little boy taking a cooking class this fall, but traditional aprons hurt his neck. This will make him much more comfortable!
LikeLike
Thank you so very much for the pattern!! It looks easy:))))) I work in ceramics and use lots of aprons and I’ve been wanting one without ties. I also plan to make several gifts for friends! Thank you for your generosity!!!
LikeLike
Matching mommy and daughter aprons will be the perfect gift for my DIL. Thank you for your kindness.
LikeLike
thanks for this, just made it up for my granddaughter as part of her Christmas present dressing up clothes. Worked brilliantly and came out well. Most grateful.
LikeLike
merci pour ce tuto et le patron bien expliqués. j envisageais de me faire ce genre de tablier. Cela tombe bien! je vais donc imprimé et me mettre au travail. Cela me donne une idée de cadeau de noël sympa. Merci!
Bonne journée!
LikeLike